Hello World 2
Introduction
In the previous tutorial, you worked with the MessagePrinter Component Type, and learned how to configure it to print a message you chose at build time. This helped you understand the various stages involved in building flight software with the FSDK, but was not a very realistic development task.
Typically when using the FSDK to produce your flight software you will need to create or modify Component Types and write their implementations.
In this tutorial you will learn how to do just that. You will add new functionality to the MessagePrinter Component Type, implement it, and then test it in a Deployment.
Along the way, you will learn how to create Actions which take Arguments. You will also be introduced to Parameters, which are used to give access to, and control over, a component instance's state.
|
In this tutorial, you will:
|
Before You Begin
The GEN1_ROOT environment variable should be set to the FSDK root directory. This is used by codegen to locate the necessary files and directories.
Open a terminal in the FSDK root directory and navigate to the Documentation/Tutorials directory using the following command.
cd Documentation/TutorialsExecute the script to set the GEN1_ROOT environment variable.
. set_gen1_root.shEcho the GEN1_ROOT environment variable to confirm it has been set to the correct directory.
echo $GEN1_ROOT|
If this command fails, check that |
Actions With Arguments
In the previous tutorial, you were briefly introduced to Actions as a way to execute a component instance's functionality on command.
Actions can also have an Argument. Like the Arguments of a function in C, an Action's Argument can be used to dynamically control its behaviour.
|
In this section of the tutorial you will add a new |
Adding the printUserMessage Action
To add a new Action to a Component Type, you need to add a new <Action> element to its componentType.xml. To specify that an Action takes an Argument, you also need to include an <Argument> element.
Open the MessagePrinter componentType.xml, found here:
components/inc/MessagePrinter/componentType.xmlAdd the following <Action> element below the printGreeting Action:
<action name="printUserMessage">
  <Description>
    Print a message, provided as an argument, to the console.
  </Description>
  <Argument name="message" minBytes="1" maxBytes="255">
    <Description>
      The message to print.
    </Description>
  </Argument>
</action>
Having changed the componentType.xml, you now need to generate the Component, and update its implementation.
codegen componenttype generate components/inc/MessagePrinterSince an implementation file already exists for the MessagePrinter Component, the above command creates a template file. This file contains skeleton code for the Component's updated implementation and can be used to update the
original file. The template file is named MessagePrinter.template.c and can be found here: components/src/MessagePrinter/MessagePrinter.template.c
To update the Component Implementation, you can copy whichever new functions are needed from the generated template file. It is recommended that you retain the same function order in the Component Implementation and the template file to help with comparisons and maintenance.
Copy the skeleton code for MessagePrinter_printUserMessage() from MessagePrinter.template.c (including its description banner) and paste it below the MessagePrinter_printGreeting() function in MessagePrinter.c.
Notice that, unlike the MessagePrinter_printGreeting() function, the new Action function has a pu8_Message pointer Argument. This pointer can be used to access the Argument data provided by the user. The u8_Length Argument
contains the length of the data pointed to by pu8_Message, and must be honoured when accessing the pointer.
Accessing pu8_Message safely is assisted by some generated template code which checks u8_Length against limits derived from the model. These limits are defined in the generated components/inc/MessagePrinter/MessagePrinter_sizes.h header.
You must now update the implementation so it takes the byte buffer pu8_Message and prints it out, taking into account u8_Length.
You can try this yourself if you wish, or if you’d prefer you can use the implementation we’ve provided below.
Show the modifications to the MessagePrinter_printUserMessage() Action skeleton
/*---------------------------------------------------------------------------*
* Print a message, provided as an argument, to the console.
*---------------------------------------------------------------------------*/
status_t MessagePrinter_printUserMessage
(
MessagePrinter_t *pt_MessagePrinter,
const ui8_t *pu8_Message,
ui8_t u8_Length
)
{
status_t t_Status; /* The current status */
/* Check the length of the argument is valid */
if (u8_Length < MESSAGEPRINTER_PRINT_USER_MESSAGE_MIN_ARG_SIZE)
{
/* Error: invalid argument length */
t_Status = STATUS_INVALID_PARAM;
}
else
{
TASK_PROTECTED_START(
&pt_MessagePrinter->t_Lock, >_LockTimeout, t_Status)
{
- /* TODO: Implement printUserMessage action handler */
- t_Status = STATUS_NOT_IMPLEMENTED;
+ /* An array to hold pu8_Message with a null terminator added */
+ ui8_t ru8_MessageNullTerminated[
+ MESSAGEPRINTER_PRINT_USER_MESSAGE_MAX_ARG_SIZE + 1];
+
+ strncpy(
+ (char *)&ru8_MessageNullTerminated[0],
+ (const char *)pu8_Message,
+ u8_Length);
+
+ /* Guarantee a null terminator */
+ ru8_MessageNullTerminated[u8_Length] = '\0';
+
+ UTIL_LOG_INFO(
+ "MessagePrinter says '%s'", &ru8_MessageNullTerminated[0]);
}
TASK_PROTECTED_END(
&pt_MessagePrinter->t_Lock, >_LockTimeout, t_Status);
}
return t_Status;
}The MessagePrinter Component Type now has a new Action printUserMessage.
Testing the printUserMessage Action
The MessagePrinter Component Type is already instantiated in the provided hello_world_2 Deployment.
In order to invoke the printUserMessage Action, you must generate, build and run the Deployment using the same approach as before:
 codegen deployment generate hello_world_2
 make -C hello_world_2 force target
 ./hello_world_2/bin/linux/hello_world_2
You will then see the following output:
INF: Main.c:67 Platform initialisation successful
INF: Deployment.c:36 Deployment initialisation successful
To invoke the new Action, you’ll need to run tmtclab and connect it to the running Deployment:
-
Use the
Deployment Managementdialog to select thehello_world_2SCDB. -
Use the
Connect…dialog to connect to the Deployment. As before, selectConnection type: TCP Clientand setAddress,PortandFramingto their default values.
Once connected, navigate to the printUserMessage Action in the tree on the left.
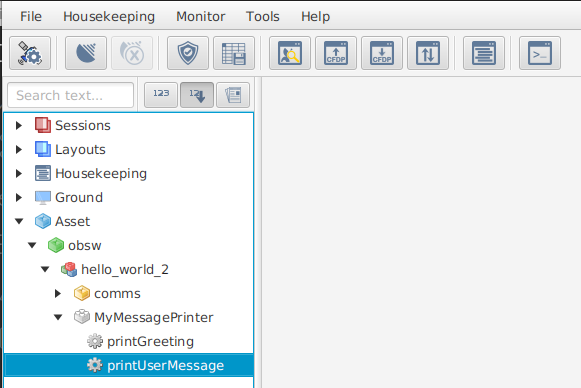
Double-click the Action to open an Action invocation dialog.
Notice that the dialog for this Action has a field for entering the Argument. The details of the Action's Argument were captured in the SCDB and then loaded by tmtclab. tmtclab then automatically provides the user interface necessary to provide the new Argument data.
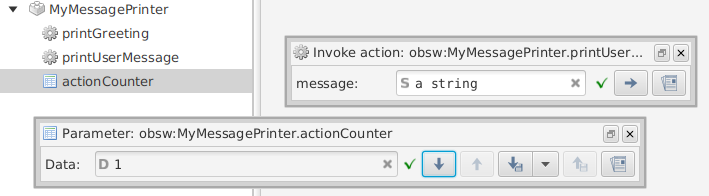
Change the Argument field to string formatting by clicking the H (for
"hex") so it changes to an S (for "string").
Now type in a string to print, and click the invoke button.

In the terminal running hello_world_2 you will see your message printed:
INF: MessagePrinter.c:126 MessagePrinter says 'a string to print'Once you are happy the Action is working, press CTRL+C in your terminal to kill the Deployment.
Leave tmtclab running so you can use it again later in the tutorial.
|
The In the next section you will be introduced to Parameters. You will create one which interacts with the |
Parameters
Parameters are one of the most widely used features of Components in the FSDK. Almost every Component Type has at least one Parameter to give insight into, or control over, its behaviour:
-
Many Component Types have an
enabledParameter to allow them to be switched on and off. -
Component Types which handle data transmission and reception may have Parameters for counting the number of bytes transmitted and received.
-
A Component Type for controlling a payload could represent the payload’s settings using Parameters - an imager might have Parameters for image size, resolution, filtering, and so on.
An important feature of a Parameter is its type. Among others, Parameters may be integers, floats, or raw byte arrays.
Parameters may also have multiple rows, in which case they are referred to as vector Parameters.
Finally, Parameters are either mutable or read-only. The value of Mutable Parameters can be set externally to the Component, whereas the value of Read-Only Parameters can only be set internally by the Component.
|
In this section of the tutorial, you will add a Read-Only Parameter indicating how many times the This will require the addition of a new Parameter to the Component Type, the addition of a new state variable to the component type structure, and modification of the |
Adding the actionCounter Parameter
To add a new Parameter to a Component Type, you need to add a new <Parameter> element to its componentType.xml. MessagePrinter currently has no Parameters, so a containing <Parameters> element is also required.
Open the MessagePrinter componentType.xml and add the following <Parameters> element just below the <!-- Parameters --> comment:
<Parameters>
  <Parameter name="actionCounter" readOnly="true">
    <Description>
      The number of times the action has been invoked.
    </Description>
    <Value type="unsigned" bits="32"/>
  </Parameter>
</Parameters>
As before, this changes the Component Type, so you must once again generate MessagePrinter:
codegen componenttype generate components/inc/MessagePrinterThe above command overwrites the template file MessagePrinter.template.c with updated code including a new Parameter getter function, MessagePrinter_getActionCounter().
Copy this function, including its description banner, and paste it in MessagePrinter.c just below the MessagePrinter_printUserMessage() function.
You will implement the getter function later, but first we need to take a closer look at some of the details of Component Implementations.
The MessagePrinter_t Structure
Notice how the first Argument to MessagePrinter_getActionCounter() is a pointer to a MessagePrinter_t structure. This structure represents the Component instance whose actionCounter Parameter is being accessed.
The MessagePrinter_t type is defined in components/inc/MessagePrinter/MessagePrinter_types.h.
|
While this tutorial deals only with the Every Component Type has a header corresponding to |
You can freely change the definition of the MessagePrinter_t structure to meet the needs of the Component Implementation.
At runtime, a MessagePrinter_t structure will be declared and initialised for each component instance.
In general, if the instances of your Component Type need to have some state, you will add variables to the definition of the component type structure - in this case MessagePrinter_t.
A common pattern in the FSDK is for Parameters to access state held in the component type structure.
|
You will now use this pattern to implement the |
Adding State to MessagePrinter
You need each instance of MessagePrinter to have its own counter, so a new member of MessagePrinter_t is required.
It is good practice to ensure the new member’s name and type match those defined for the Parameter in the componentType.xml. This makes your Component Implementation easier to understand for others.
With this in mind, open the MessagePrinter types header (components/inc/MessagePrinter/MessagePrinter_types.h), and add
u32_ActionCounter to the MessagePrinter_t definition.
Show the added MessagePrinter_t member
/** The MessagePrinter component */
typedef struct
{
    /** A protection lock to protect the MessagePrinter state */
    Task_ProtectionLock_t t_Lock;
-   /* TODO: Add component state variables here */
+   /** Action counter */
+   ui32_t u32_ActionCounter;
}
MessagePrinter_t;
When a data member is added like this, it should always be initialised in the Component's local initialisation function. When a Deployment is started, this function is called for each component instance in the Deployment.
This function is part of the Component Implementation so, in the case of MessagePrinter, is found in MessagePrinter.c and is named MessagePrinter_localInit().
Modify MessagePrinter_localInit() to provide a sensible initial value for u32_ActionCounter.
Show the modified MessagePrinter_localInit() function
/*---------------------------------------------------------------------------*
 * Carry out local component initialisation for the MessagePrinter component
 *---------------------------------------------------------------------------*/

status_t MessagePrinter_localInit
(
    MessagePrinter_t *pt_MessagePrinter,
    const MessagePrinter_Init_t *pt_InitData
)
{
+   /* The action hasn't been invoked yet */
+   pt_MessagePrinter->u32_ActionCounter = 0;
+
    /* Initialise the protection lock */
    return Task_ProtectionLock_init(
        &pt_MessagePrinter->t_Lock,
        MESSAGEPRINTER_CONTAINER_TASKING_TYPE(pt_MessagePrinter));
}
Using Locks
Note that you need to access u32_ActionCounter in 3 separate contexts:
-
MessagePrinter_localInit()to initialise it. This only runs once at startup, so you don’t need to consider it further here. -
MessagePrinter_getActionCounter()to return its value to the user. -
MessagePrinter_printUserMessage()to increment it.
In general, there is nothing to stop the actionCounter Parameter and printUserMessage Action from being accessed concurrently. For example, the Action could be scheduled for autonomous invocation at the same time as a user happens to request the Parameter's value.
To prevent dangerous race conditions, Component Implementations must use Locks to protect resources which may be accessed from different contexts.
The FSDK assists you with this by providing convenient macros for creating protected sections.
Look at the MessagePrinter_getActionCounter() skeleton code you copied from the template file earlier.
You will see it uses the TASK_PROTECTED_START() and TASK_PROTECTED_END() macros. Using these macros creates a scope in which the Lock object passed into the macros is held, and cannot be acquired by any other context.
As long as both MessagePrinter_getActionCounter() and MessagePrinter_printUserMessage() use locked sections to access u32_ActionCounter, there is no possibility of race conditions.
|
Practically, the chance of race conditions in this case is extremely small, but not negligible! It is particularly important to think carefully about concurrent access when working with the FSDK, because your code may be run in many different environments with wildly different low-level behaviour. Finally, while the protected resource in this tutorial is very simple (a single 32-bit word), there are many situations, like the handling of packets in communications Components, where a failure to correctly protect underlying resources can cause very difficult to diagnose issues when the software is integrated. |
Implementing the actionCounter Parameter
You now have the elements needed to update the Component Implementation such that actionCounter behaves as required by the Component Type:
-
An underlying state variable held in the component instance (
u32_ActionCounter), and -
An understanding of how to use Locks to protect this state variable.
You will now update the Component Implementation using these elements.
First, modify the MessagePrinter_getActionCounter() Parameter getter function you added earlier so it returns the value of u32_ActionCounter to the user, accessing it from within the locked section.
Show the updated MessagePrinter_getActionCounter() implementation
/*---------------------------------------------------------------------------*
* Get the actionCounter parameter
*---------------------------------------------------------------------------*/
status_t MessagePrinter_getActionCounter
(
MessagePrinter_t *pt_MessagePrinter,
ui32_t *pu32_Value
)
{
status_t t_Status; /* The current status */
TASK_PROTECTED_START(&pt_MessagePrinter->t_Lock, >_LockTimeout, t_Status)
{
- /* TODO: Implement actionCounter get accessor */
- t_Status = STATUS_NOT_IMPLEMENTED;
+ *pu32_Value = pt_MessagePrinter->u32_ActionCounter;
}
TASK_PROTECTED_END(&pt_MessagePrinter->t_Lock, >_LockTimeout, t_Status);
return t_Status;
}Next, update the MessagePrinter_printUserMessage() function so that, each time the Action is invoked, it increments the u32_ActionCounter state variable. Again, this must be performed inside the function’s locked section.
Show the change required in the MessagePrinter_printUserMessage() implementation
/* Guarantee a null terminator */
ru8_MessageNullTerminated[u8_Length] = '\0';
UTIL_LOG_INFO(
"MessagePrinter says '%s'", &ru8_MessageNullTerminated[0]);
+ pt_MessagePrinter->u32_ActionCounter++;
}
TASK_PROTECTED_END(
&pt_MessagePrinter->t_Lock, >_LockTimeout, t_Status);
}
return t_Status;
}Testing the actionCounter Parameter
You have now completed the MessagePrinter Component Implementation.
In order to test the behaviour of actionCounter you must once again generate, build and run the hello_world_2 Deployment:
 codegen deployment generate hello_world_2
 make -C hello_world_2 force target
 ./hello_world_2/bin/linux/hello_world_2
Now switch back to tmtclab (if you have previously closed it, you can relaunch it using the instructions above) and reload the SCDB using the Deployment Management dialog.
Note that since the path to your SCDB hasn’t changed since your last tmtclab session, you can reload it by clicking Reload Deployment.
Connect to the Deployment and use the tmtclab tree to open an Action invocation dialog for printUserMessage.
In the tree you will also now see an entry for the actionCounter Parameter.
Double-click actionCounter to open its Parameter accessor dialog.
Click the Get current value ⬇ button in the Parameter accessor dialog to retrieve the value of actionCounter.
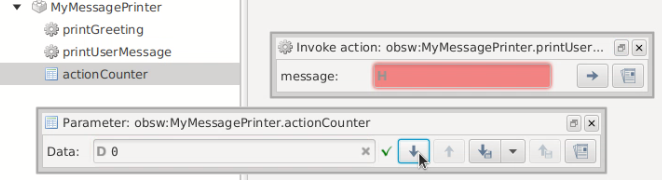
The value 0 should be returned as that is the Parameter's initial state.
If you now invoke the printUserMessage Action, passing in a string Argument of your choice, then issue another get request for actionCounter, you should see the Parameter's value increment.
Wrap Up
In this tutorial you have:
-
Added to a Component implementation using the same steps that will be required when working on your own Components in the future.
-
Extended your understanding of Actions to include Arguments and how they can be used to provide input to your Component Implementations.
-
Learned about Parameters and how they can be implemented using your component type structure.
-
Been introduced to Locks and their role in preventing race conditions arising from multiple access to resources.
In the next tutorial you will be introduced to more capabilities you can add to Component Types. This will build on the understanding you have developed here using a different Component Type and Deployment.
Click here to move on to that now.