Hello World 1
Introduction
In this tutorial, we will introduce by example some of the basic ideas used in the FSDK, and how they can be used to produce flight software.
When you have completed this tutorial, you’ll have built and run a piece of flight software which, in principle, is ready for launch.
|
In this tutorial, you will:
|
Before You Begin
The GEN1_ROOT environment variable should be set to the FSDK root directory. This is used by codegen to locate the necessary files and directories.
Open a terminal in the FSDK root directory and navigate to the Documentation/Tutorials directory using the following command.
cd Documentation/TutorialsExecute the script to set the GEN1_ROOT environment variable.
. set_gen1_root.shEcho the GEN1_ROOT environment variable to confirm it has been set to the correct directory.
echo $GEN1_ROOT|
If this command fails, check that |
Components and Deployments
All software environments and languages include concepts which allow software reuse. C has functions. Java and other object-oriented languages have classes and modules. Critically, these concepts provide reuse via encapsulation.
In the FSDK, we make our software reusable by encapsulating functionality in Components. A Component for processing Space Packets, for example, contains all the logic and packet details for that communication protocol. It may be used any time that handling of Space Packets is required.
|
In this tutorial, you’ll look at a simple Component called In real flight software, much more complex functionality is usually needed. In future tutorials you’ll learn how to write Components capable of fulfilling those requirements. |
To produce executable flight software with the FSDK, you must create what’s known as a Deployment. This is a collection of Components, along with the connections between them, and any initialisation data they require to run.
Once a Deployment is properly configured, it can be built and run. With the right Components included, you can interact with it like a real spacecraft. We’ll cover the basics of each of these steps in this tutorial.
The MessagePrinter Component
A Component is defined by 2 things. To understand a given Component fully you must have knowledge of both:
-
Its type. This defines how the "outside world" interacts with the Component. It’s described in XML, in a
componentType.xmlfile. It also contains documentation about what the Component is for, and how to use it. -
Its implementation. This defines the behaviour of the Component, and how it concretely meets the obligations which the type promises. In the FSDK, implementations are written in C.
For this tutorial, we’ve provided a complete MessagePrinter Component, and you’ll be using its printGreeting Action. Actions are one of the mechanisms you can use to execute a Component's functionality on command.
Let’s take a look at how printGreeting is defined as part of MessagePrinter, both in the Component Type and the Component Implementation.
Open up the MessagePrinter componentType.xml.
It can be found at the following path: components/inc/MessagePrinter/componentType.xml
|
If you can’t find the |
In the componentType.xml, you’ll find the following Action definition:
<Action name="printGreeting">
  <Description>
    Print a greeting, specified in initialisation data, to the console.
  </Description>
  <Documentation><Markdown>
    The message to print is set by the `z_Greeting` member of the
    `MessagePrinter` component type's initialisation data.
  </Markdown></Documentation>
</Action>
As you can see, the Action is named and documented in the Component Type. When it’s implemented, the Component must provide functionality matching what’s described in the type.
To help you get started, we have provided you with a complete implementation for printGreeting. You can see that the Action should behave as expected by opening up the Component Implementation, which is found in the Component's main C file: components/src/MessagePrinter/MessagePrinter.c
/*---------------------------------------------------------------------------*
 * Print a greeting, specified in initialisation data, to the console.
 *---------------------------------------------------------------------------*/

status_t MessagePrinter_printGreeting
(
    MessagePrinter_t *pt_MessagePrinter
)
{
    /* Get the greeting from the MessagePrinter initialisation data */
    cstring_t z_Greeting =
        MESSAGEPRINTER_CONTAINER_INIT_DATA(pt_MessagePrinter)->z_Greeting;

    /* Print out the greeting using the info logging macro */
    UTIL_LOG_INFO("MessagePrinter says '%s'!", z_Greeting);

    /* Nothing can possibly go wrong */
    return STATUS_SUCCESS;
}|
Notice that there are a number of C files associated with this Component in the same directory as |
As you can see, when the MessagePrinter_printGreeting() function is called, it will print out the message from the initialisation data, just as described in the type definition.
When calling such a function, we typically describe it in terms of the type definition. In this case we would describe it as invoking the printGreeting Action.
In order to make use of the MessagePrinter Component Type, and invoke its printGreeting Action from the "outside world", we need to instantiate it in a Deployment.
The hello_world_1 Deployment
As described above, Deployments are collections of Components with their various connection and data requirements satisfied.
A Component which has all of its requirements satisfied, and can therefore form part of some running flight software, is referred to as an instance.
To use MessagePrinter, we have provided a hello_world_1 Deployment. A Deployment's structure is captured in XML in a file called deployment.xml, so that codegen can produce the boilerplate code required to connect component instances together.
The hello_world_1 deployment.xml can be found at the following path: hello_world_1/deployment.xml`
It contains a handful of component instances required to support communication with the tmtclab ground software. You can safely ignore these component instances.
The Deployment also contains a MessagePrinter component instance. Since MessagePrinter has no requirements on other Components, the XML required to instantiate it is simple. It can be found near the bottom of the deployment.xml:
<Component name="MyMessagePrinter" type="MessagePrinter">
  <Description>
    An instance of the MessagePrinter which will print your message
  </Description>
</Component>
Note that, along with the name of the type we are talking about, we specify a name for the instance which uniquely identifies it.
Let’s now provide the MyMessagePrinter instance with the message it’s going to print.
Setting up MyMessagePrinter
As we saw in the MessagePrinter Component Implementation, the initialisation data for the MessagePrinter type specifies the message to print.
To set this data for the MyMessagePrinter component instance, look in the Deployment's src/init tree:
hello_world_1/src/init/
├── MyMessagePrinter_Init.c
└── comms
    ├── PacketStream_Init.c
    ├── SpacePacket_Init.c
    ├── TCPServer_Init.c
    ├── pus
    │   ├── PUSCore_Init.c
    │   ├── PUSToAAS_Init.c
    │   └── PUSToPAS_Init.c
    └── services
        ├── AASTarget_Init.c
        └── PASTarget_Init.c
Each file is associated with a component instance and contains the initialisation data for that instance.
Open hello_world_1/src/init/MyMessagePrinter_Init.c.
This file contains a MessagePrinter_Init_t structure. This is a type which is generated by codegen when a new Component Type is created.
|
If you’re curious, you can find the definition of The members of this structure are chosen by the author of the Component Type, so each type can have whatever initialisation data it requires. The values, however, are set on a per-instance basis, by the author of the Deployment and its initialisation data. This allows instances of the same Component Type to behave differently from each other in a Deployment. We’ll look at this in more detail in a later tutorial. |
Notice the TODO in the MyMessagePrinter initialisation data.
You need to provide a value for z_Greeting, as follows:
/** The MyMessagePrinter initialisation data */
const MessagePrinter_Init_t gt_MyMessagePrinterInit =
    {
        .z_Greeting = "Help, I'm trapped in a tutorial factory!"
    };
You may set z_Greeting to any string you wish.
The communications component instances are already configured, so now we just need to build the Deployment.
Building the hello_world_1 Deployment
Before building a Deployment, we recommend you first generate it.
The generation step produces a spacecraft database (SCDB). This is a description of all the Components in the Deployment. It allows tmtclab to interact with the flight software, without requiring the labour-intensive construction of a packet database.
The generation step also produces all of the Deployment's glue code. The code for hello_world_1 is already up to date, but it’s a good idea to generate Deployments before building them anyway, just in case.
To generate the hello_world_1 Deployment, run the following command in the the_basics/hello_world_1 directory:
codegen deployment generate hello_world_1Note that this command does not print any output when executed successfully.
Now use the build system to build the Deployment:
make -C hello_world_1 force targetThis command instructs the make build tool to enter the hello_world_1 directory. The force target arguments cause the Deployment and all its dependencies to be built.
Show expected output
Building executable build/linux/bin/linux/hello_world_1.elf
Building image bin/linux/hello_world_1
make: Leaving directory '<path>'
<path> is the path to your deployment.
Once the build has succeeded you have some completed flight software. You’re ready to set up the ground software, run the flight software, and connect the two together.
Running tmtclab
The tmtclab ground software requires very little configuration in order to communicate with Deployments produced in the FSDK. The first step is to launch the tmtclab executable.
Open a new terminal, navigate to the root of your FSDK, and run:
 cd GNDSW/TMTCLab
 ./runLab.cmd
A splash screen should now pop up, confirming that tmtclab is loading.
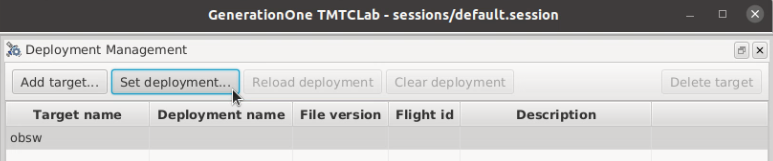
Once tmtclab has launched, click the Manage Deployments… button to load the hello_world_1 SCDB.

Select the obsw target, and then click Set Deployment….
If you have used tmtclab before and already have a Deployment set, this button will instead read Replace Deployment….
This launches the Open new SCDB… dialog:
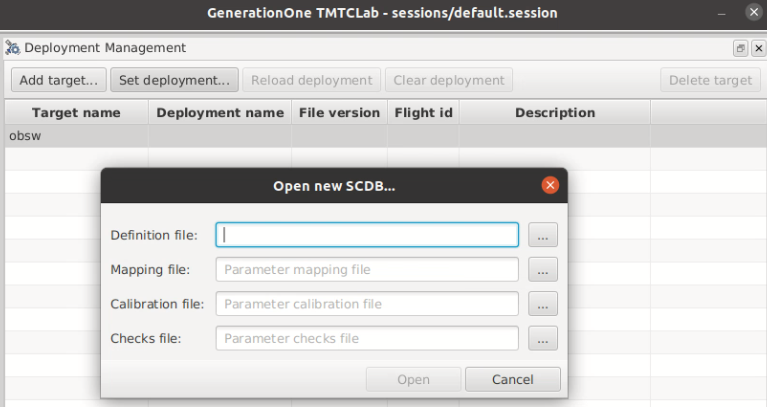
Click the … file picker button for Definition file: and select the SCDB we generated above: hello_world_1/doc/deployment.scdb.
Next, click Open.
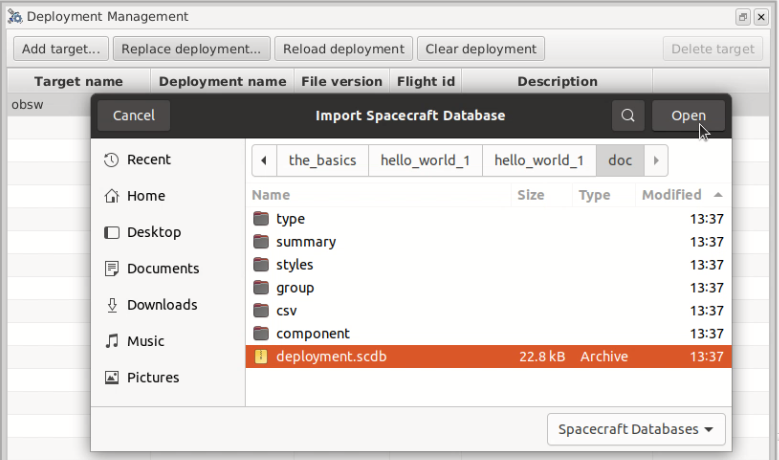
You don’t need any of the other files which tmtclab supports for now, so click Open.
The hello_world_1 Deployment has now been imported.

Finally, close the Deployment Management dialog.
These configuration steps only need to be carried out once. tmtclab will now load this SCDB automatically on startup.
Bringing Everything Together
It’s now time to run the flight software you built above.
To do this, execute the binary as follows in the the_basics/hello_world_1 directory:
./hello_world_1/bin/linux/hello_world_1Show expected output
INF: Main.c:67 Platform initialisation successful
INF: Deployment.c:36 Deployment initialisation successful
The Deployment is now running and awaiting commands from the ground software. To command it, you’ll need to connect to it from tmtclab.
Switch back to tmtclab and click Connect…:

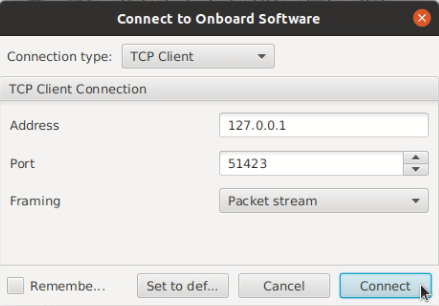
In order to communicate with the running flight software, you’ll need to configure tmtclab as a TCP client.
In the Connection type: dropdown, select TCP Client. Ensure Address, Port and Framing are all set to their default values as shown below, then click Connect.
The connection indicator in the bottom-right corner of the tmtclab main window should now report a connection:

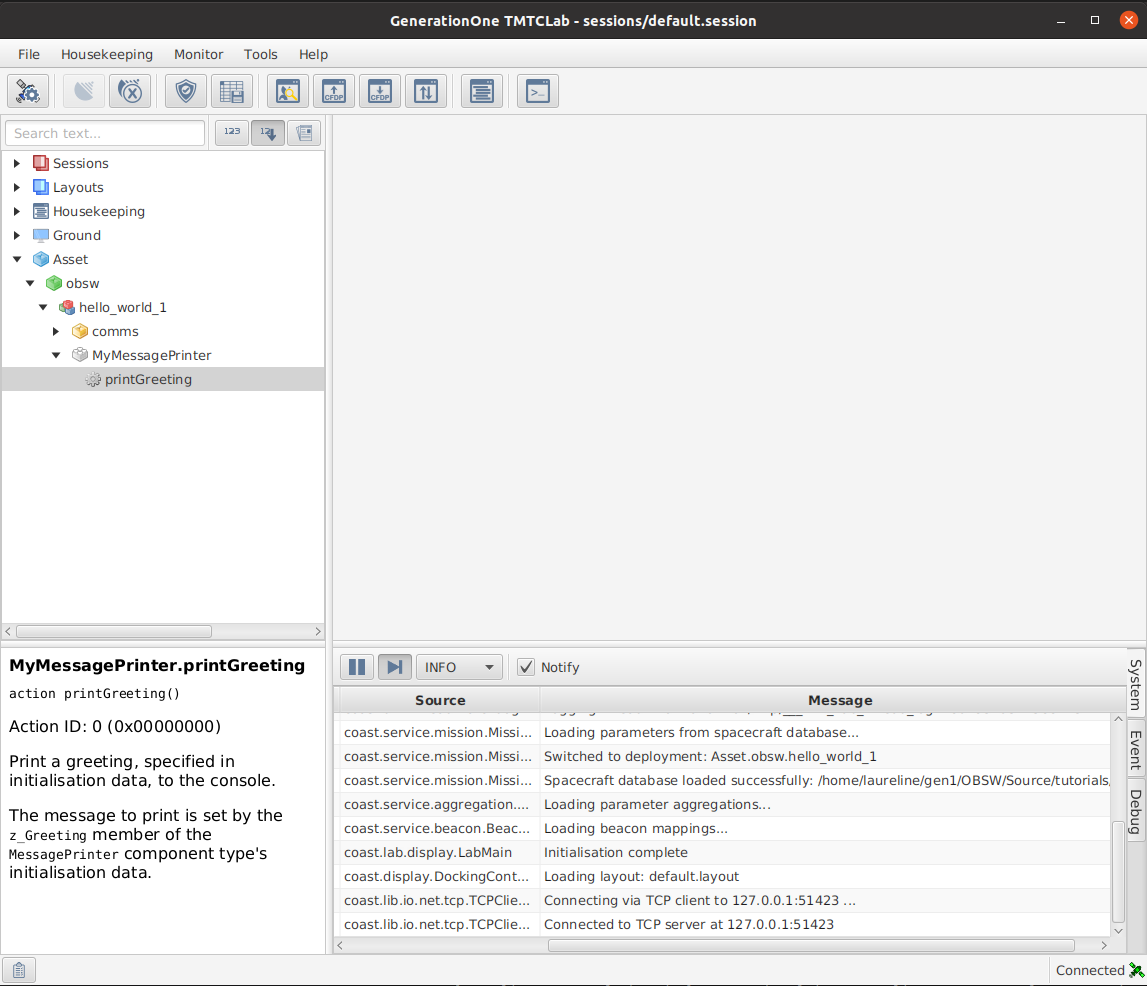
On the left-hand side of the tmtclab main window, find the Asset node in the tree. This represents the spacecraft tmtclab is connected to - in your case the asset is actually your own computer.
Expanding the Asset node, you will find the obsw node, and within that, the hello_world_1 node. You can expand this to see the component instances in the Deployment.
At the very bottom, you should see the MyMessagePrinter component instance, and within it, you will see the printGreeting Action:
Double click on printGreeting to launch an Action invocation dialog.
You can now click the Invoke Action ➡ button to invoke the printGreeting Action.
The hello_world_1 Deployment should print your message to the terminal in which it is running.

You can see the details of the telecommands and telemetry sent between the ground and flight software by looking at the Packet monitor view:

Notice how the hello_world_1 SCDB allows tmtclab to generate telecommands and interpret telemetry automatically - we have not done any explicit packet configuration.
Wrap Up
In this tutorial we have:
-
Introduced Components as encapsulated software functionality which can be reused.
-
Seen how a Component is described by its type and its implementation.
-
Introduced Deployments as sets of Component instances.
-
Set up an example
MessagePrintercomponent instance calledMyMessagePrinterin our basichello_world_1example Deployment. -
Seen how to configure tmtclab to communicate with a Deployment.
-
Used tmtclab to invoke an Action, and seen its effect on the running flight software.
In the next tutorial, you’ll learn how to make changes to Component Types and implementations so that you can introduce your own functionality into your flight software.
Click here to move on to that now.