Hello World 3
1. Introduction
As you have seen in these tutorials, Component Types have many different features which can be used when building ground software. Using the right features, and combining them in the right way, is key to producing powerful, flexible Component Types.
In this tutorial you will develop a new Component Type which will regularly report some information to the client. It will do this autonomously, without an operator requesting it via Actions or Parameters.
You will implement this Component Type using some features you’ve already seen and some new ones which will be introduced along the way:
-
The desired information will be delivered to the client by Publishing Events.
-
To Publish these Events regularly and autonomously you’ll use a Task.
-
You’ll then use a Mutable Parameter, introduced in the previous tutorial, to control what information is delivered, and when.
|
In this tutorial, you will:
|
2. Before You Begin
Guidance on the styles and conventions used in these tutorials is available here.
Unless otherwise directed, all commands in this tutorial must be run in the the_basics/HelloWorld3 workspace.
You must have Groundkit installed as described in the Getting Started Guide.
Install a copy of the tutorials locally by running hgk-prepare-tutorials.
Navigate to the the_basics/HelloWorld3 workspace in a terminal and run hgk workspace prepare to ensure it is ready to use.
3. Tasks
Groundkit provides a structured way to build responsive, concurrent ground‑software applications by using a consistent execution model based on Tasks.
As you might expect, Tasks are part of the definition of a Component Type.
There are 2 kinds of Tasks in Groundkit, each with their own defined behaviour:
-
Periodic Tasks are triggered each time a fixed time interval has elapsed.
-
Sporadic Tasks are triggered when data is added to their associated queue.
In this tutorial you will use a Periodic Task.
|
In this section of the tutorial you’ll add a Periodic Task named
|
3.1. Adding the publishEvent Task
To add a Periodic Task to a Component Type, you must add a <PeriodicTask>
element to its componentType.xml.
EventPublisher currently has no Tasks, so in this case you will also need a
<Tasks> element to contain the <PeriodicTask> element.
Open the EventPublisher componentType.xml. Add the following below
the <!-- Tasks --> comment:
<Tasks>
  <PeriodicTask name="publishEvent" defaultPeriod="3">
    <Description>
      A task used to periodically publish events
    </Description>
  </PeriodicTask>
</Tasks>
This adds a new Periodic Task named publishEvent to the Component Type,
with a default period of 3 seconds. This period can be overridden when the
EventPublisher Component Type is instantiated.
Having updated the componentType.xml, you now need to generate the
Component Type.
Generate the Component Type using the following command:
hgk component-type generate EventPublisherThis creates a Task method in the Component Type's template file called
EventPublisherImpl.periodicTaskPublishEvent().
Copy this method, along with its banner comment, and paste it into
EventPublisherImpl.java below EventPublisherImpl.localFini() to maintain the method
order.
Replace the TODO in the Task method with a call to
container.logInfo() so that a message will be printed to the
terminal when the Task executes.
Show the updated task code
@@ -64,6 +64,14 @@ public class EventPublisherImpl implements EventPublisherImplInterface {
     //       and any resources opened in connectionInit should be closed here.
   }

+  /**
+   * Implementation of the Periodic Task: publishEvent.
+   * A task used to periodically publish events
+   */
+  void periodicTaskPublishEvent() {
+    container.logInfo("EventPublisherImpl.periodicTaskPublishEvent() executed!");
+  }
+|
To enable logging, we need to add a logging implementation to the workspace. We have done that for you in |
3.2. Updating the EventPublisherDemo Deployment Type
In the previous section you added a new Task to the Component Type. A Component Type is a blueprint for Component Instances, so every Component Instance must also now include the new Task.
There is already an instance of the EventPublisher Component Type in the
EventPublisherDemo Deployment Type. You will now update the
Deployment Type so that you can see the new Task execute.
Open library/deployment_types/eventpublisherdemo/src/main/resources/com/brightascension/deploymenttypes/eventpublisherdemo/deploymentType.xml and update the
MyEventPublisher Component Instance to include the new publishEvent
Task.
Show the updated MyEventPublisher Component Instance
      <Component name="MyEventPublisher" type="EventPublisher">
        <Description>
          An instance of the EventPublisher which will periodically publish events
        </Description>
+       <Tasks>
+         <PeriodicTask name="publishEvent" priority="0"/>
+       </Tasks>
      </Component>
When adding a Task to a Component Instance you must also specify its
priority. This sets the priority that the OSAL (Operating System Abstraction
Layer) will apply to this Task when running multiple Tasks concurrently.
The higher the number, the higher the priority.
|
Task priorities are not yet implemented in Groundkit. For now, they are ignored. |
We could have also specified a period which would take precedence over the
defaultPeriod specified in the componentType.xml. Omitting this attribute
results in the defaultPeriod being used.
To test the new Task, build the Mission and run the Deployment Instance using the same approach as previous tutorials:
hgk mission build HelloWorld3
java -jar output/missions/HelloWorld3/EventPublisherDemo/EventPublisherDeployment/EventPublisherDeployment.jar
You should see the following message being printed to the terminal every three seconds:
11:48:33.197 [main] INFO  c.b.m.h.e.e.deployment.Deployment - Initialising the EventPublisherDeployment Deployment.
11:48:33.256 [GRPCServerInst-serverStartup-thread-0] INFO  c.b.c.g.g.g.GRPCServerImpl - Starting server on port: 8900
11:48:36.257 [MyEventPublisher-publishEvent-thread-0] INFO  c.b.c.e.e.EventPublisherImpl - EventPublisherImpl.periodicTaskPublishEvent() executed!
11:48:39.257 [MyEventPublisher-publishEvent-thread-0] INFO  c.b.c.e.e.EventPublisherImpl - EventPublisherImpl.periodicTaskPublishEvent() executed!
Once you are happy the Task is working as it should, terminate the Deployment Instance in the terminal.
4. Events
In Groundkit Events are used for asynchronous signalling by Component Types. Component Types may Publish Events (produce them) and Subscribe to Events (receive them). There are usually more Component Types Publishing Events than Subscribing to them.
Events are used for many different purposes, examples include:
-
proxying an Event from a remote system
-
Publishing an Event when some Parameter value exceeds pre-defined limits.
|
In this section of the tutorial you will define a new Event, and learn how to Publish it from the Task you added in the previous section. |
4.1. Adding the SomethingHappened Event
To add an Event to a Component Type, you must add an <Event> element to
its componentType.xml.
EventPublisher currently has no Events, so in this case you will also need
an <Events> element to contain the <Event> element.
Open the EventPublisher componentType.xml. Add the following below
the <!-- Events --> comment:
<Events defaultBaseId="10000">
  <Event name="SomethingHappened" severity="info">
    <Description>
      An event to notify the operator that something happened!
    </Description>
  </Event>
</Events>
Each Event has a numeric identifier associated with it, and the defaultBaseId
is the identifier used by the first Event defined in this Component Type. Each
subsequent Event is numbered sequentially from defaultBaseId.
defaultBaseId should be set such that each of the Events defined by the
Component Type will be given a unique identifier when used in a
Deployment Type.
A value of 10000 here is sufficiently unique for our purposes.
When defining an Event you must also specify its severity. The lowest
severity is info and is appropriate for this tutorial.
Generate the Component Type using the same command as before.
This creates a new class in
library/componenttypes/eventpublisher/generated/main/java/com/brightascension/componentimpls/eventpublisher/types/EventPublisherEvents.java, which contains the static field defining the new Event's identifier.
You will now see how the new Event can be Published.
4.2. Using EDS
In Groundkit, Services are a way of formally describing the connections between Component Types. These will be described in subsequent tutorials. You will learn more about Services in the later Using A Service tutorial.
For now, it is sufficient to know that, in order to Publish or Subscribe to an Event, Component Types must use the Event Distribution Service (EDS). EDS is the Service which defines the Event Message. It is an example of a Publish-Subscribe Service.
To Publish Event Messages from the EventPublisher Component Type you
must add a <Services><Published><Service> element to its componentType.xml.
Open the EventPublisher componentType.xml. Add the following below
the <!-- Services (Provided, Required, Subscribed, Brokered and Published) -->
comment:
<Services>
  <Published>
    <Service name="task" type="component.EDS">
      <Description>
        A publication for publishing Event messages from the publishEvent
        periodic task
      </Description>
    </Service>
  </Published>
</Services>
Generate the EventPublisher Component Type.
This generates a new method that you can call from the EventPublisherImpl.componentEDSTask() method in the
Component Implementation to Publish Events. Its signature can be found in the interface file
ComponentEDSTask.java:
 /**
  * The event Service Message from the Service: EDS
  * An event emitted by a component
  *
  * @param eventId The Event ID
  * @param status A status (exception code) associated with an event.
  * @param info An optional blob of information.
  * @throws GenOneBaseException
  */
  void publishEvent(EDSEventId eventId, long status, byte[] info) throws GenOneBaseException;
You will now call this method from the publishEvent Task to Publish an
Event periodically.
4.3. Publishing the SomethingHappened Event
Copy across the ComponentEDSTask import statement from the EventPublisherImpl.java.template file.
Show the added import statement
@@ -5,6 +5,8 @@
 package com.brightascension.componentimpls.eventpublisher.eventpublisherimpl;

 import com.brightascension.genone.service.ServiceConsumerId;
+import com.brightascension.componentimpls.eventpublisher.eventpublisherimpl.include.container.component.eds.ComponentEDSTask;
 import com.brightascension.genone.service.ServiceSubscriberId;
 import com.brightascension.genone.exception.GenOneBaseException;
 import com.brightascension.genone.service.ServicePublisherId;
Copy across the componentEDSTask() private method from EventPublisherImpl.java.template.
Show the added private method
@@ -64,6 +65,18 @@ public class EventPublisherImpl implements EventPublisherImplInterface {
     //       and any resources opened in connectionInit should be closed here.
   }

+  private ComponentEDSTask componentEDSTask() {
+    return container.componentEDSTask();
+  }
+
   /**
    * Implementation of the Periodic Task: publishEvent.
    * A task used to periodically publish events
    */
   void periodicTaskPublishEvent() {
     container.logInfo("EventPublisherImpl.periodicTaskPublishEvent() executed!");
   }
Add an import to access the generated Event types for this component.
Show the added import statement
 package com.brightascension.componentimpls.eventpublisher.eventpublisherimpl;

 import com.brightascension.genone.service.ServiceConsumerId;
 import com.brightascension.componentimpls.eventpublisher.eventpublisherimpl.include.container.component.eds.ComponentEDSTask;
+import com.brightascension.componentimpls.eventpublisher.types.EventPublisherEvents;
 import com.brightascension.genone.service.ServiceSubscriberId;
 import com.brightascension.genone.exception.GenOneBaseException;
 import com.brightascension.genone.service.ServicePublisherId;
To Publish the SomethingHappened Event from the publishEvent Task,
update the Task method to call EventPublisherImpl.componentEDSTask().publishEvent(), passing in
EventPublisherEvents.EVENT_PUBLISHER_EVENT_ID_SOMETHING_HAPPENED as the Event ID argument.
Add an import for the SerialisationUtils utility method so you can serialise a String.
Show the added import
 package com.brightascension.componentimpls.eventpublisher.eventpublisherimpl;

 import com.brightascension.genone.service.ServiceConsumerId;
 import com.brightascension.componentimpls.eventpublisher.eventpublisherimpl.include.container.component.eds.ComponentEDSTask;
 import com.brightascension.componentimpls.eventpublisher.types.EventPublisherEvents;
 import com.brightascension.genone.service.ServiceSubscriberId;
 import com.brightascension.genone.exception.GenOneBaseException;
 import com.brightascension.genone.service.ServicePublisherId;
+import com.brightascension.genone.util.SerialisationUtils;
Then update the task code to publish the event, utilising SerialisationUtils to serialise your message.
Show the updated task code
   /**
    * Implementation of the Periodic Task: publishEvent.
    * A task used to periodically publish events
    */
   void periodicTaskPublishEvent() {
     container.logInfo("EventPublisherImpl.periodicTaskPublishEvent() executed!");
+    try {
+      // Use 0 for success
+      componentEDSTask().publishEvent(
+          EventPublisherEvents.EVENT_PUBLISHER_EVENT_ID_SOMETHING_HAPPENED,
+          0,
+          SerialisationUtils.getBytesForFixedString("Hello"));
+    } catch (GenOneBaseException e) {
+      container.logError("Error publishing event", e);
+    }
   }
Notice that, as well as an Event ID, the
publishEvent() method allows you to provide long status and byte[] info arguments.
These allow you to add more detailed information to the Published Event.
long status is typically used to indicate what kind of failure caused the
Event to be Published. For Events not caused by failures,
0 is appropriate for this argument.
byte[] info allows you to include up to 8 arbitrary bytes of data in the
Event. If you do not wish to pass any additional information pass null.
Having added an EDS Publication to EventPublisher you now need to update
the EventPublisherDemo Deployment Type again. You’ll do that in the next
section.
4.4. Updating the EventPublisherDemo Deployment Type
As described above, Publish-Subscribe Services like EDS define Messages which can be Published and Subscribed to by Component Types.
Component Types which Publish Messages are referred to as Publishers. Those which Subscribe to Messages are referred to as Subscribers.
Component Types may also Broker Messages. Brokers are
responsible for receiving Messages from Publishers and dispatching them to
Subscribers. As a result, Publishers, like the EventPublisher
Component Type, must be connected to Brokers when used in
Deployment Types.
Open library/deployment_types/eventpublisherdemo/src/main/resources/com/brightascension/deploymenttypes/eventpublisherdemo/deploymentType.xml
Notice that an instance of the InContextEDSBroker Component Type is
included in EventPublisherDemo Deployment Type. This is an EDS Broker
which we provide in the GroundkitFoundation bundle. This Broker is connected to an instance of EDSTargetGRPC to make the events available over gRPC.
To test the EventPublisher Component Type you need to connect
MyEventPublisher Component Instance to the InContextEDSBroker
Component Instance.
Add the following <Connections><Services> element to MyEventPublisher.
Show the updated MyEventPublisher Component Instance
      <Component name="MyEventPublisher" type="EventPublisher">
        <Description>
          An instance of the EventPublisher which will periodically publish events
        </Description>
+       <Connections><Services>
+         <Service name="task" component="EDSBrokerInst" service="edsBroker"/>
+       </Services></Connections>
        <Tasks>
          <PeriodicTask name="publishEvent" priority="0"/>
        </Tasks>
      </Component>
When making a Publish-Subscribe Service connection like this you must always specify:
-
The name of the Service Publication on the connecting Component Instance (the Publisher or Subscriber) using the
nameattribute. In this casenameistask, as that is the name of the EDS Publication in theEventPublishercomponentType.xml. -
The name of the Component Instance serving as the Broker using the
componentattribute. In this casecomponentisEDSBrokerInst, as that is the name of the desired Broker. -
The name of the Service Brokerage on the Broker being connected to using the
serviceattribute. In this caseserviceisedsBroker, as that is the name of theInContextEDSBrokerComponent Type's EDS Brokerage.
To test that MyEventPublisher now correctly Publishes Events via the
InContextEDSBroker you need to build the HelloWorld3 Mission and run the
EventPublisherDemo Deployment Instance as before.
Don’t be alarmed if you see error messages appearing in the console; this is expected. This occurs because Lab is not connected, so the published event sent via the TCP route does not reach the client.
If you prefer not to see such a large error message, you can configure this in EventPublisherImpl.
You will see the same message as before being printed to your terminal every 3 seconds. To see the Events which the Component Instance is now raising, you will need to use either Helix Lab or Bruno.
4.4.1. Using Helix Lab
Open Lab, load the MDB and connect to the Deployment Instance. Recall from the previous tutorials, that you can connect using host "localhost" and port "65534".
Open the Event log by selecting Logs from the left-hand navigation panel and
ensuring 'Event Log' is selected at the top. You should see the New Events Available button at the top updating as new Events arrive. Select this button to update the table and view new Events.
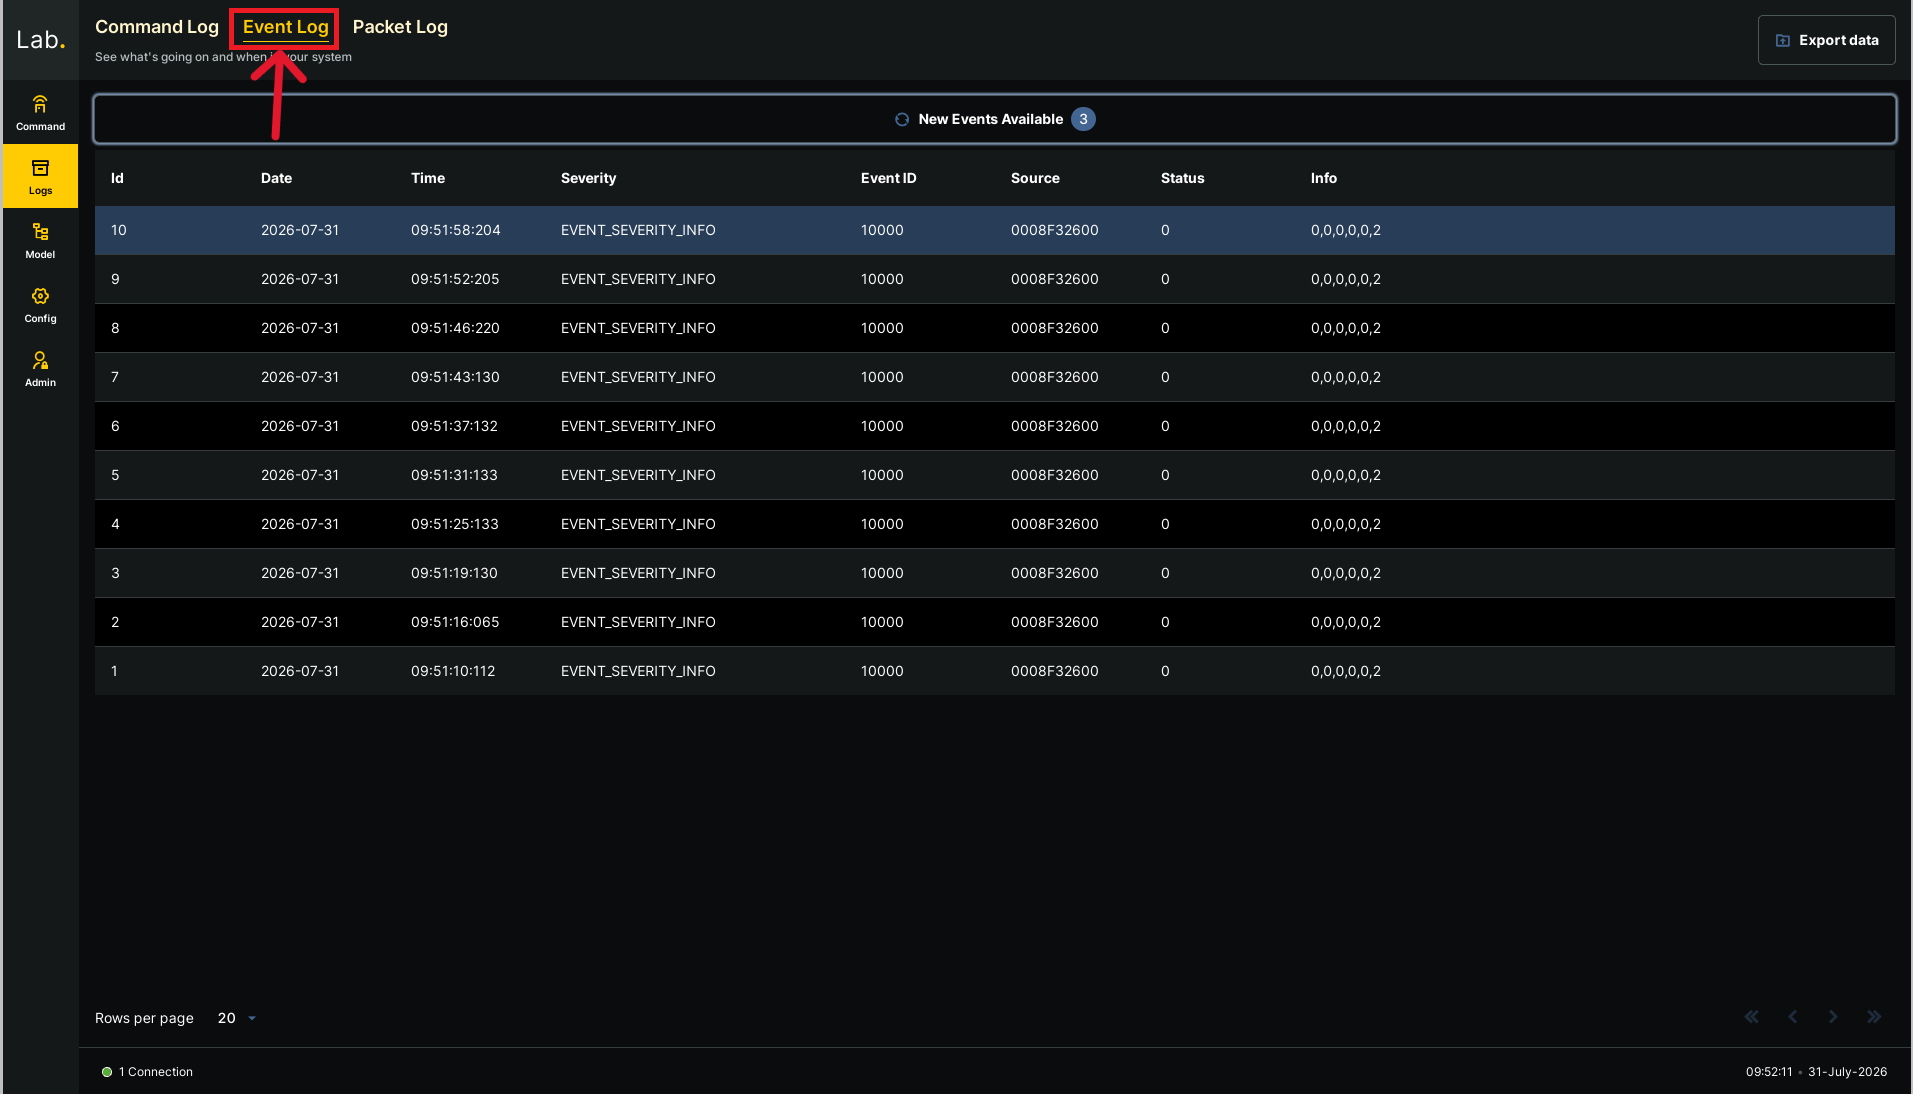
Once you are happy to proceed, terminate the process in the terminal.
|
You have successfully added a Task to the There is currently no logic controlling when it Publishes an Event. In the next section you’ll add a Parameter to control this behaviour. |
4.4.2. Using Bruno
Use the same approach as in the previous tutorial to open Bruno and load the collection provided at bruno/HelloWorld3:
-
Launch Bruno from the application menu.
-
Click the Open Collection button and navigate to the collection and click the Open button.
-
Select the
subscribe_to_eventsrequest under theHelloWorld3collection. -
Click the → right arrow button at the top of the request to send the request.
-
You should see a stream of responses like the below. As before, you can decode the base64 encoded
infoparameter using thebase64utility.
The expected response.
{
  "event_message": {
    "event_id": {
      "index": 10000,
      "severity": 0
    },
    "status": 0,
    "info": "SGVsbG8="
  }
}
Decode the info field with base64.
echo 'SGVsbG8=' | base64 -dOnce you are happy to proceed, disconnect from the Events stream by clicking the Cancel button and terminate the process in the terminal.
|
You have successfully added a Task to the There is currently no logic controlling when it Publishes an Event. In the next section you’ll add a Parameter to control this behaviour. |
5. Controlling the publishEvent Task
In the previous tutorial you learned that Parameters are used to give insight into, or control over, a Component Instance's behaviour, and worked with a Read-Only Parameter.
It is also possible to define Mutable Parameters, whose values may be set externally to the Component Type. When implementing a Mutable Parameter you must provide a Parameter setter method as well as a Parameter getter.
|
In this section of the tutorial you will add a Mutable Parameter to the
|
5.1. Adding the eventPeriod Parameter
Currently EventPublisher Publishes an Event every time its
publishEvent Task runs.
You will now add a new eventPeriod Parameter so that the
Component Implementation Publishes an Event 1 in every eventPeriod
times the Task runs.
To add the new Parameter, add the following <Parameters> element to
the Component Type's componentType.xml below the <!-- Parameters -->
comment:
<Parameters>
  <Parameter name="eventPeriod">
    <Description>
      Controls how often the SomethingHappened event is published by the
      publishEvent task
    </Description>
    <Documentation><Markdown>
      A value of zero indicates the `SomethingHappened` event will never be
      published.

      A non-zero value indicates the `SomethingHappened` event will be published
      1 in every `eventPeriod` times the `publishEvent` task runs.

      - A value of '1' publishes the event *every* time the task runs
      - A value of '2' publishes the event *every second* time the task runs
      - A value of '3' publishes the event *every third* time the task runs
      - etc.
    </Markdown></Documentation>
    <Type>
      <Integer signed="true" bits="8"/>
    </Type>
  </Parameter>
</Parameters>
Notice that this Parameter does not specify a value for the readOnly
attribute. It is not required for Mutable Parameters as its default value is
"false".
Generate the Component Type.
In the template file you will now see getEventPeriod() and
setEventPeriod() - the Parameter getter and setter
methods.
Copy and paste these methods into EventPublisherImpl.java.
You will need it to implement the new Parameter getter
and setter methods.
You will use the same pattern as in the previous tutorial to store this Parameter's value.
Add a new AtomicInteger eventPeriod field to EventPublisherImpl.java.
Show the new field added to EventPublisherImpl.java
 package com.brightascension.componentimpls.eventpublisher.eventpublisherimpl;

 import com.brightascension.genone.service.ServiceConsumerId;
 import com.brightascension.componentimpls.eventpublisher.eventpublisherimpl.include.container.component.eds.ComponentEDSTask;
 import com.brightascension.componentimpls.eventpublisher.types.EventPublisherEvents;
 import com.brightascension.genone.service.ServiceSubscriberId;
 import com.brightascension.genone.exception.GenOneBaseException;
 import com.brightascension.genone.service.ServicePublisherId;
 import com.brightascension.genone.util.SerialisationUtils;

+import java.util.concurrent.atomic.AtomicInteger;

public class EventPublisherImpl implements EventPublisherImplInterface {
   // Container reference
   private final EventPublisherImplContainer container;

+  private final AtomicInteger eventPeriod = new AtomicInteger();
+
   /**
    * Constructor for EventPublisher
    *
You now need to update the getter and setter methods you copied into
EventPublisherImpl.java earlier so that they provide read and write access,
respectively, to EventPublisherImpl.eventPeriod. The setter method must update eventPeriod atomically.
Update the getter and setter methods in EventPublisherImpl.
Show the changes to the EventPublisherImpl implementation
@@ -80,12 +80,10 @@ public class EventPublisherImpl implements EventPublisherImplInterface {
    * Getter for eventPeriod parameter from the Component Type : EventPublisher
    * Controls how often the SomethingHappened event is published by the publishEvent task
    * @return byte representing the value of the eventPeriod
-   * @throws GenOneBaseException Placeholder exception type for any PAS exception
    */
   @Override
-  public byte getEventPeriod() throws GenOneBaseException {
-    // TODO: Implement eventPeriod get accessor
-    throw new OperationNotProvidedException();
+  public byte getEventPeriod() {
+    return (byte) eventPeriod.get();
   }

   /**
@@ -96,8 +94,10 @@ public class EventPublisherImpl implements EventPublisherImplInterface {
    */
   @Override
   public void setEventPeriod(byte eventPeriod) throws GenOneBaseException {
-    // TODO: Implement eventPeriod set accessor
-    throw new OperationNotProvidedException();
+    if (eventPeriod < 0) {
+      throw new IllegalArgumentException("Invalid event period: " + eventPeriod);
+    }
+    this.eventPeriod.set(eventPeriod);
   }
Although this Parameter doesn’t control the Event yet, you can still test the Parameter accessor methods at this stage once we expose the component.PAS service over gRPC.
Open the EventPublisherDemo deploymentType.xml. Add the following Component
Instance of the PASTargetGRPC Component Type, which is available from
GroundkitFoundation:
<Component name="PASTargetGRPCInst" type="core.component.pas.PASTargetGRPC">
  <Description>
    Provides access to parameters over gRPC
  </Description>
</Component>
Generate the mission as you have done before by running hgk mission generate HelloWorld3
Provide a value for PASTargetGRPCImplInitData.port, as follows (the port should that found in EDSTargetGRPCInstInit):
/**
 * The init data for the PASTargetGRPCImpl instance.
 * This file will not be regenerated when a deployment is regenerated, you will have to update these
 * values manually if you wish to change them or delete this file.
 */
public final class PASTargetGRPCInstInit {
  public static final PASTargetGRPCImplInitData INIT_DATA = new PASTargetGRPCImplInitData(8900);

  private PASTargetGRPCInstInit() {
    // Private constructor to hide the implicit public constructor.
  }
}5.2. Test with Lab
Carry out the following steps, which you should now be familiar with:
-
Build the Mission
-
Run the Deployment Instance
-
Open Lab
-
Load the MDB
-
Connect to the Deployment Instance
-
Add a command card for the
eventPeriodParameter to theMy Commandssection of theCommandview. -
Expand the
eventPeriodcommand card.
Notice that the expanded command card contains both a Get ⬇ button and
a Set ⬆ button. You can use these to get or set the value stored in
eventPeriod, respectively.
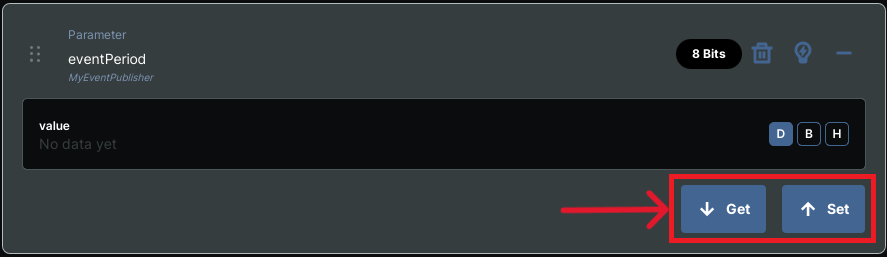
Give this a try and make sure that the Parameter value changes as expected.
Once you are happy to proceed, disconnect from the Deployment Instance instance in the terminal.
5.3. Test with Bruno
Carry out the following steps, which you should now be familiar with:
-
Build the Mission.
-
Run the Deployment Instance.
-
Open Bruno, select and send the
get_parameterrequest in theHelloWorld3collection. -
You should see the response. The value is the base64 encoding of
0, the Parameter's default value.
{
  "time": {
    "basic": 0,
    "fractional": 0
  },
  "value": "AA=="
}-
Select the
set_parameterrequest. Set thevalueparameter toAw==, the base64-encoding of3. -
Send the
set_parameterrequest. Now when you run theget_parameterrequest, you can see that the value of the Parameter has changed.
When you are happy that it is working as expected, terminate the Deployment Instance.
Now that you can set the value of eventPeriod, you need to update the publishEvent Task to make use of it. You’ll do this in the next section.
5.4. Updating the publishEvent Task
As described in the eventPeriod <Documentation> element you added to the
componentType.xml, your goal here is to Publish an Event every
eventPeriod times the publishEvent Task runs.
To implement this functionality you will need a counter to keep track of how
many times the publishEvent Task has run.
This counter will form part of an EventPublisher Component Instance's
state, so as with eventPeriod, you need to add a publishEventCounter field to the object.
Show the new member added to EventPublisherImpl
@@ -35,6 +35,7 @@ public class EventPublisherImpl implements EventPublisherImplInterface {
   private final EventPublisherImplContainer container;

   private final AtomicInteger eventPeriod = new AtomicInteger();
+  private final AtomicInteger eventPeriodCounter = new AtomicInteger();
You’ll now need to implement logic in EventPublisherImpl to make the behaviour
of the eventPeriod parameter match its documentation.
There are several ways to do this. One way is to update the publishEvent
Task so that each time it runs, eventPeriodCounter is incremented. When
eventPeriodCounter reaches eventPeriod, Publish the Event and reset the
counter to 0.
Remember that to guarantee thread safety, eventPeriodCounter should be read and updated atomically.
Try and make the changes to publishEvent yourself if you wish, or, if you’d
prefer, use the implementation we’ve provided below.
Show the updated implementation of the publishEvent task
@@ -106,13 +106,38 @@ public class EventPublisherImpl implements EventPublisherImplInterface {
    * A task used to periodically publish events
    */
   void periodicTaskPublishEvent() {
-    container.logInfo("EventPublisherImpl.periodicTaskPublishEvent() executed!");
+    byte period = getEventPeriod();
+    int updatedCounter = eventPeriodCounter.updateAndGet(counter -> {
+      if (period == 0) {
+        // Events are disabled, reset the counter to 0
+        return 0;
+      }
+      counter++;
+      if (counter % period == 0) {
+        return 0;
+      }
+      return counter;
+    });
+
+    container.logInfo(String.format("Period: %d, counter: %d", period, updatedCounter));
+
+    if (period != 0 && updatedCounter == 0) {
       try {
         // Use 0 for success
         componentEDSTask().publishEvent(
           EventPublisherEvents.EVENT_PUBLISHER_EVENT_ID_SOMETHING_HAPPENED,
           0,
-           SerialisationUtils.getBytesForFixedString("Hello"));
+           new byte[] { period });
       } catch (GenOneBaseException e) {
         container.logError("Error publishing event", e);
       }
+    }
+  }
Notice that we used the value of eventPeriod as the information field for the
Published Event. As mentioned previously, this field allows you to provide
extra information associated with your Event.
Build the Mission and run the Deployment Instance. Using either Lab or Bruno, confirm
that your implementation methods correctly and meets the requirements laid
out in the eventPeriod Parameter documentation.
Remember that the value is set to 0 during start up, so you won’t see any Events being Published until you set it to a non-zero value.
6. Wrap Up
In this tutorial you have:
-
Reinforced your understanding of how to work with Component Types and their implementations.
-
Learned how to use Periodic Tasks to make a Component Type do some work regularly and autonomously.
-
Been introduced to Services, specifically Publish-Subscribe Services.
-
Learned how to define Events, and how to Publish them from Component Types.
-
Learned how Parameters can be used to control the behaviour of Component Instances.
-
Used these concepts within a Component Implementation to meet some basic functional requirements. This approach of combining the features of Component Types to produce solutions is a key part of successful development with Groundkit.
7. What Now?
This concludes the basic Groundkit tutorials. These tutorials have given you the basic tools you need to produce operational ground software with Groundkit.
We have provided further tutorials which will help you learn how to use some more advanced features of Component Types. The first of these looks at details of using Services which were not covered in this tutorial.
Click here to move on to that now.