Hello World 1
1. Introduction
In this tutorial, we will introduce some of the basic ideas used in Groundkit, and how they can be used to produce ground software.
When you have completed this tutorial, you’ll have built and run a piece of ground software.
|
In this tutorial, you will:
|
2. Before You Begin
Guidance on the styles and conventions used in these tutorials is available here.
Unless otherwise directed, all commands in this tutorial must be run in the the_basics/HelloWorld1 workspace.
You must have Groundkit installed as described in the Getting Started Guide.
Install a copy of the tutorials locally by running hgk-prepare-tutorials.
Navigate to the the_basics/HelloWorld1 workspace in a terminal and run hgk workspace prepare to ensure it is ready to use.
3. Components, Deployments and Missions
All software environments and languages include concepts which allow software reuse. C has functions. Java and other object-oriented languages have classes and modules. Critically, these concepts provide reuse via encapsulation.
In Groundkit, we make our software reusable by encapsulating functionality in Component Types. A Component Type for processing Space Packets, for example, contains all the logic and packet details for that communication protocol. It may be used any time that handling of Space Packets is required.
|
In this tutorial, you’ll look at a simple Component Type called
In real ground software, much more complex functionality is usually needed. In future tutorials you’ll learn how to write Component Types capable of fulfilling those requirements. |
Component Types are used by instantiating them. Each time you instantiate a Component Type a new Component Instance is created.
To produce executable ground software with Groundkit, you must create what’s known as a Deployment Type. This is a reusable collection of Component Instances, along with the connections between them.
Much like Component Types, Deployment Types are used by instantiating them, creating, as you might expect, Deployment Instances.
Deployment Types are instantiated in the context of a Mission. To instantiate a Deployment Type you must provide Initialisation Data for each of its Component Instances. Initialisation Data is used to control the behaviour of Component Instances at run time.
Deployment Instances can be built and run. If they contain the necessary Component Instances, then your client code will be able to interact with them.
In this tutorial, we’ll illustrate these abstract ideas with examples.
3.1. The MessagePrinter Component Type
A Component Type is defined by two things:
-
Its
componentType.xml. This is a file which describes how the "outside world" must interact with it. It’s written in XML so that it can be read by the Groundkit Tooling for code generation purposes. It also usually contains documentation about what the Component Type is for, and how to use it. -
Its implementation. This determines the behaviour of the Component Type and dictates the way in which the Component Type fulfils the obligations described in its
componentType.xml. In Groundkit, Component Implementations are written in Java.
For this tutorial, we’ve provided a complete MessagePrinter Component Type.
This includes both its componentType.xml and its MessagePrinterImpl.java
implementation.
You’ll be using its printGreeting Action. Actions are one of the
mechanisms you can use to execute a Component Type's functionality on
command.
Let’s take a look at how printGreeting is both defined and implemented.
Navigate to the library/componenttypes/messageprinter directory.
This directory contains a Maven project for MessagePrinter and its implementation.
Open the componentType.xml file found in the library/componenttypes/messageprinter/src/main/resources/com/brightascension/componenttypes/messageprinter directory.
|
If you can’t find the |
In the componentType.xml, you’ll find the following Action definition:
<Action name="printGreeting">
<Description>
  Print a greeting, specified in initialisation data, to the console.
</Description>
<Documentation><Markdown>
  The message to print is set by the `greeting` field of the
  `MessagePrinter` component type's initialisation data.
</Markdown></Documentation>
</Action>
As you can see, the componentType.xml contains the name and documentation for
the Action. When it’s implemented, the Component Implementation must
provide functionality matching what’s described here.
The implementation of printGreeting, which we’ve provided, can be found by
opening the Component Type's main implementation file, MessagePrinterImpl.java.
Open the MessagePrinterImpl.java file found in the messageprinter Maven project and
navigate to the MessagePrinterImpl.printGreeting() function.
You should find the following method implementation:
  /**
   * The printGreeting action from the Component Type : MessagePrinter
   * Print a greeting, specified in initialisation data, to the console.
   * @throws GenOneBaseException
   */
  public void printGreeting() throws GenOneBaseException {
    String greeting = initData.greeting();
    container.logInfo("Greeting says '%s'", greeting);
  }
As you can see, when the printGreeting() method is called, it will log out the message
from the Initialisation Data, just as described in the componentType.xml.
We use specific terminology to describe the calling of a method which
implements an Action. We say that the printGreeting Action is
invoked.
In order to make use of the MessagePrinter Component Type, and invoke its
printGreeting Action at runtime, it needs to be instantiated in a
Deployment Type.
3.2. The MessagePrinterDemo Deployment Type
As described above, Deployment Types are a collection of connected Component Instances. Choices about which Component Types to instantiate, and how those instances are connected, determine how the Deployment Type will behave when it is itself instantiated in a Mission.
Deployment Types are described by a deploymentType.xml file.
We have provided the MessagePrinterDemo Deployment Type which
instantiates the MessagePrinter Component Type introduced above.
Open the MessagePrinterDemo deploymentType.xml, found here:
library/deploymenttypes/messageprinterdemo/src/main/resources/com/brightascension/deploymenttypes/messageprinterdemo/deploymentType.xmlThis file contains Component Instances: which are essential for gRPC and TCP communication with the ground software. We will later interact with the ground software with Helix Lab over TCP, and Bruno via gRPC. For the purposes of this tutorial you can safely ignore these Component Instances.
It also contains an instance of the MessagePrinter Component Type. Since
MessagePrinter has no requirements on other Component Types, the XML
required to instantiate it is simple. It can be found near the bottom of the
deploymentType.xml:
<Component name="MyMessagePrinter" type="MessagePrinter">
  <Description>
    An instance of the MessagePrinter which will print your message
  </Description>
</Component>
Note that we specify both the Component Type to instantiate, and the name to give the Component Instance which we’re creating.
3.3. The HelloWorld1 Mission
Having constructed a Deployment Type from Component Instances, that Deployment Type can be instantiated in a Mission to produce runnable ground software.
To do so, Initialisation Data must be provided for each Component Instance in the Deployment Type. This allows a single Deployment Type to be reused in different situations, each time with its own set of Initialisation Data.
To allow you to use the MessagePrinterDemo Deployment Type, We have
provided the HelloWorld1 Mission. It is again described by an XML file,
mission.xml, which can be found here:
missions/helloworld1/mission.xmlYou will now provide the MyMessagePrinter instance with the message it’s
going to print.
4. Setting up MyMessagePrinter
As described in the MessagePrinter componentType.xml, the
Initialisation Data is used to specify the message to print.
The Initialisation Data for each Component Instance in a Mission is set in that Deployment Instance's Maven project.
> tree missions/helloworld1/messageprinterdemo/messageprinterdeployment
...
├── pom.xml
└── src
    └── main
        └── java
            └── com
                └── brightascension
                    └── missions
                        └── helloworld1
                            └── messageprinterdemo
                                └── messageprinterdeployment
                                    └── mymessageprinter
                                        └── MyMessagePrinterInit.java
Each of the Java *Init.java files is associated with a
Component Instance and contains the Initialisation Data for that instance.
Open missions/helloworld1/messageprinterdemo/messageprinterdeployment/src/main/java/com/brightascension/missions/helloworld1/messageprinterdemo/messageprinterdeployment/mymessageprinter/MyMessagePrinterInit.java.
This file contains a static MessagePrinterImplInitData INIT_DATA field. This is a type which is generated by the Groundkit Tooling when a new Component Type is created.
|
If you’re curious, the definition of The members of this structure are chosen by the author of the Component Type, so each type can have whatever Initialisation Data it requires. The values, however, are set on a per-instance basis, by the author of the Mission and its Initialisation Data. This allows instances of the same Component Type to behave differently from each other when used in different situations. |
Notice the compilation error warning in MyMessagePrinterInit.INIT_DATA.
Provide a value for MessagePrinterImplInitData.greeting, as follows:
/**
 * The init data for the MessagePrinterImpl instance.
 * This file will not be regenerated when a deployment is regenerated, you will have to update these
 * values manually if you wish to change them or delete this file.
 */
public final class MyMessagePrinterInit {
  public static final MessagePrinterImplInitData INIT_DATA = new MessagePrinterImplInitData("Hello there!");

  private MyMessagePrinterInit() {
    // Private constructor to hide the implicit public constructor.
  }
}
You may set greeting to any string you wish.
5. Setting up logging
Groundkit uses the SLF4J logging abstraction, allowing you to plug in a desired logging framework when constructing your mission.
As you can see in the MessagePrinterImpl.java implementation, we need a logging framework for the printGreeting action to do anything. In this example, we have added the logback framework for you. If you open workspace-pom.xml you’ll see the necessary dependencies specified.
  <!-- NOTE: Any dependencies specified here will be inherited by all artefacts in this workspace -->
  <dependencies>
    <dependency>
      <groupId>ch.qos.logback</groupId>
      <artifactId>logback-classic</artifactId>
      <version>${logback.version}</version>
    </dependency>
    <dependency>
      <groupId>ch.qos.logback</groupId>
      <artifactId>logback-core</artifactId>
      <version>${logback.version}</version>
    </dependency>
  </dependencies>
Configuration is provided at missions/helloworld1/messageprinterdemo/messageprinterdeployment/src/main/resources/logback.xml.
  <!-- Restrict logging to prevent flooding log output -->
  <logger name="io.grpc" level="warn"/>

  <root level="info">
    <appender-ref ref="STDOUT" />
  </root>
Now you just need to build the Mission.
6. Building HelloWorld1
The Groundkit Tooling provides functionality for building your Mission. When doing so it generates a Mission Database (MDB). This database fully describes the ground software contained within your Mission. It is used by Helix Ops to enable interaction with the mission.
To generate and build the HelloWorld1 Mission, run the
following command in the the_basics/HelloWorld1 directory:
hgk mission build HelloWorld1Show expected output
...
[INFO] Building the user-poms for the workspace HelloWorld1 and its required bundles
[INFO] Building GenOne Java project and dependencies for the mission HelloWorld1. To see Maven build output, run with --verbose.
[INFO] Generating a mission-database for the mission HelloWorld1:0.0.0 to "/home/<USER>/code/groundkit-docs/modules/tutorials/examples/the_basics/HelloWorld1/output/missions/HelloWorld1/HelloWorld1_0_0_0.missiondb"
Once the build has succeeded you have some completed ground software. You’re
ready to run the ground software, and make either TCP requests using Helix Lab or gRPC requests using the protobuf files built in output/proto of the HelloWorld1 workspace. For this tutorial, we recommend using our Lab application. However, if you prefer to make gRPC requests directly, we suggest using Bruno. You are also welcome to use your own preferred gRPC client.
|
In future Helix Lab will have the capability to support gRPC requests. |
7. Using Helix Lab
Groundkit can be used along with our tool called Helix Lab which you can use to interact with your ground software during development.
You will now launch Lab and use it to invoke the printGreeting Action.
Run Helix Lab by clicking the "Helix Lab" icon in your application’s menu.
Upon start-up, Lab always defaults to displaying the 'Config' page. This is the where you can configure the Mission to start interacting with your ground software. We will walk you through these steps now.
First you need to load the MDB associated with your Mission - this tells Lab what Components, Services, and Deployments are within the Mission you just generated.
Click the Import.missiondb button to load the MDB.
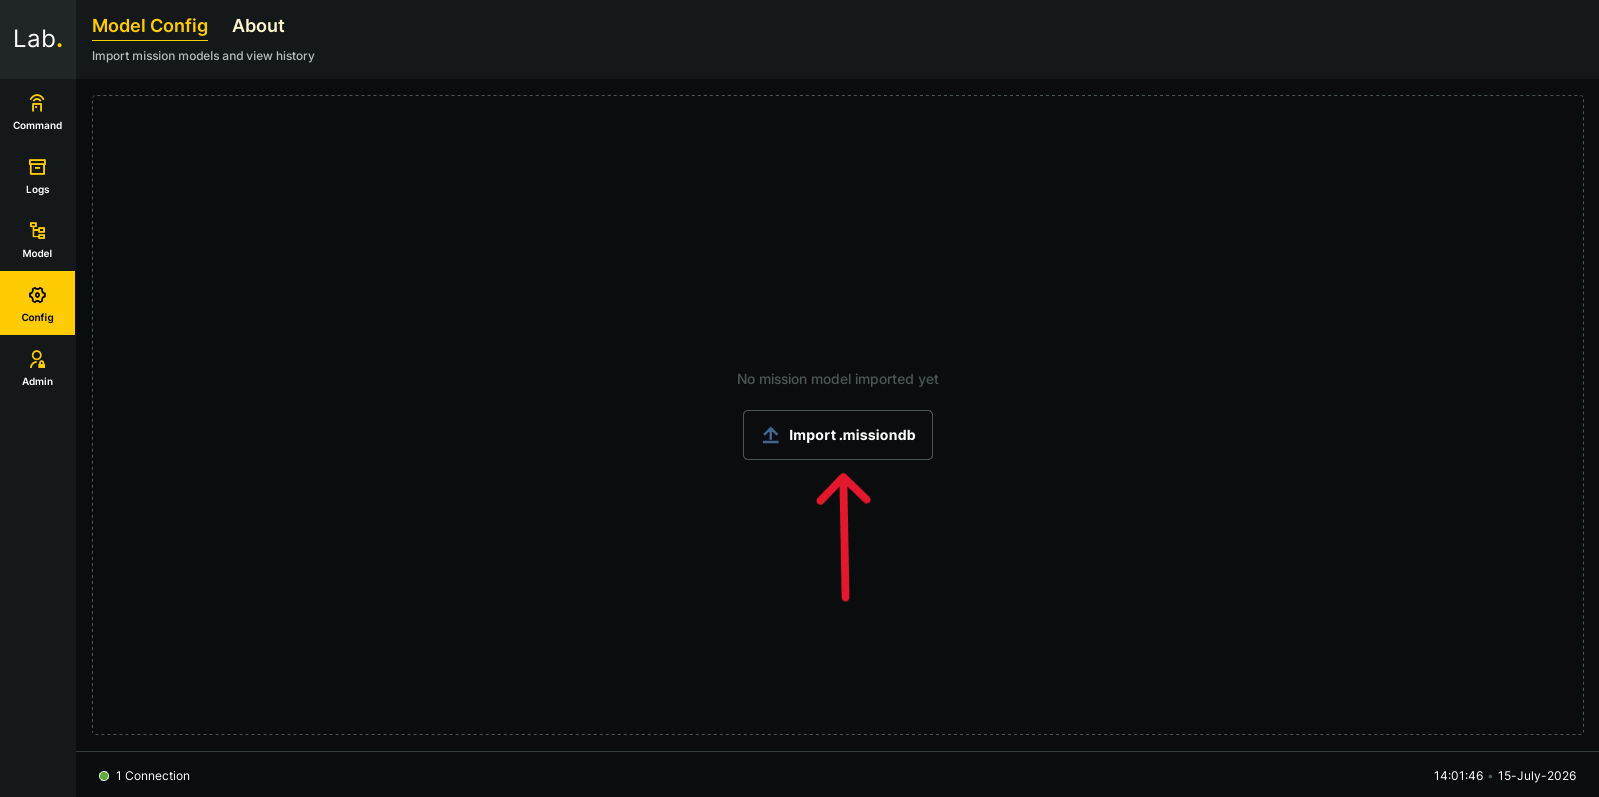
Select the MDB you generated above: output/missions/HelloWorld1/HelloWorld1_0_0_0.missiondb, then click Open
This provides Lab with all the information it requires to determine what your Mission contains, and how to interact with it.
8. Using Bruno
Bruno is a fully-offline API client. You can download it from here. You will use it to invoke the printGreeting Action.
Run Bruno by clicking the "Bruno" icon in your applications menu.
First you need to load the Bruno collection provided at bruno/HelloWorld1.
Click the Open Collection button and navigate to the collection and click the Open button.
9. Bringing Everything Together
It’s now time to run the ground software you built above.
Execute your ground software jar by running the following command in the
the_basics/HelloWorld1 directory, in your terminal:
java -jar output/missions/HelloWorld1/MessagePrinterDemo/MessagePrinterDeployment/MessagePrinterDeployment.jarShow expected output
15:04:22.679 [main] INFO  c.b.m.h.m.m.deployment.Deployment - Initialising the MessagePrinterDeployment Deployment.
15:04:22.727 [GRPCServerInst-serverStartup-thread-0] INFO  c.b.c.g.g.g.GRPCServerImpl - Starting server on port: 8900
The MessagePrinterDemo Deployment Instance is now running and awaiting gRPC commands on port 8900.
|
The gRPC port is defined in |
If you previously chose to use Lab, then following this next Lab section, otherwise proceed to the Bruno section after that one.
9.1. With Helix Lab
Switch back to Lab, Select Command in the left-hand navigation panel and click Connect in the top-right coner.
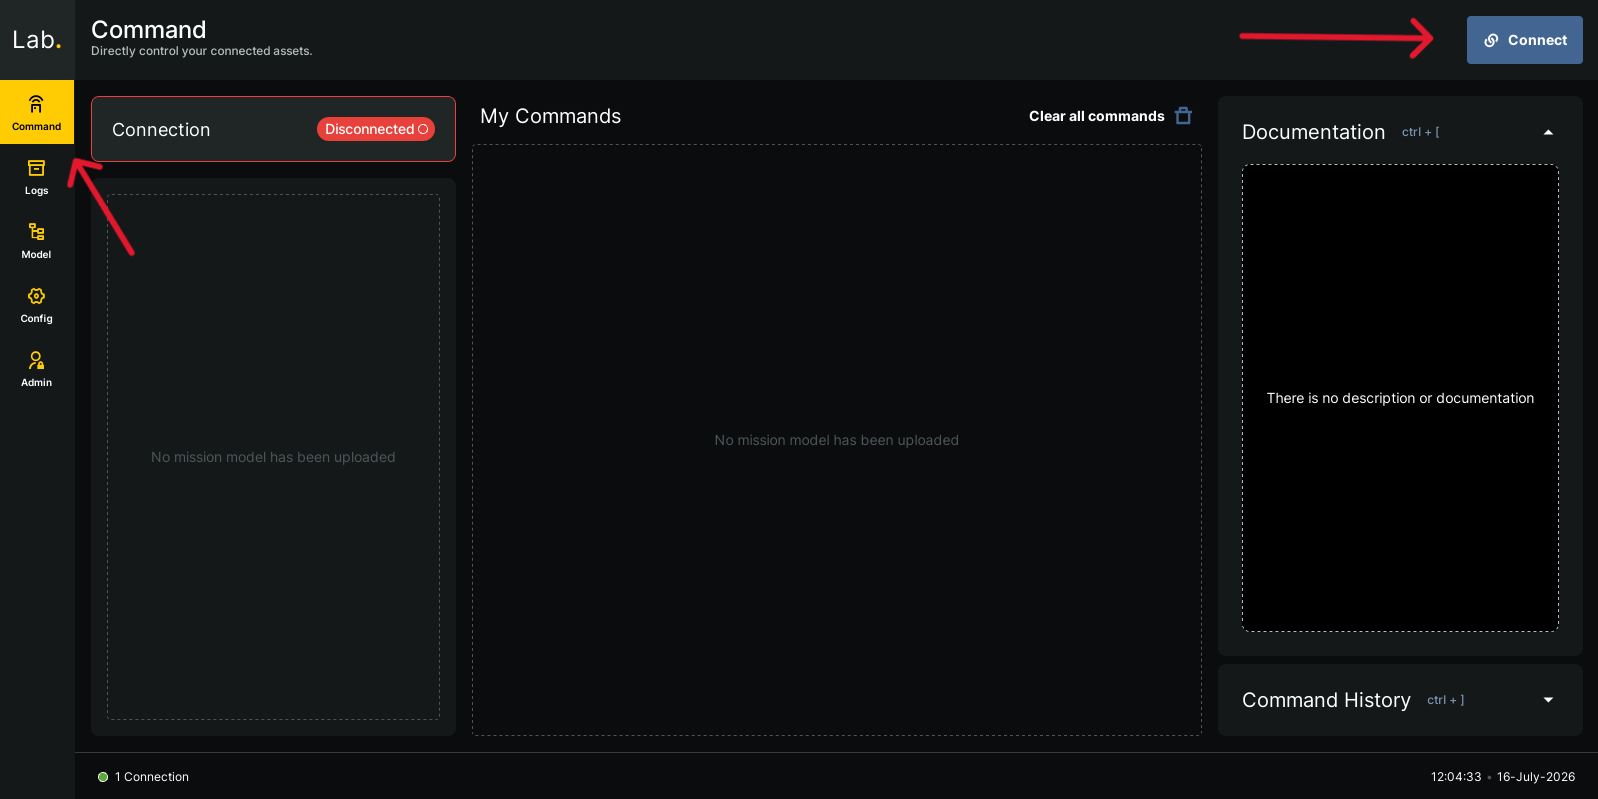
Enter the Hostname of the device on which your deployment instance is running, and the Port number specified by the initialisation data of your deployment instance’s TCP server.
Their values should be localhost and 65534 respectively.
|
Port number
Additionally, for |
Connect to the deployment by clicking the Connect button.
This populates the 'Command' view with your available mission commands, allowing you to issue commands to the ground software.
On the left hand side of this view you will see a tree-view of the Mission model. This is used to navigate through all the available commands within your Mission.
The explorer is structured as follows:
-
The top level of the explorer displays the names of the different Hosts on your ground software.
-
Clicking on a Host reveals the different Targets which use that Host.
-
Clicking on a Target reveals the different Deployment Instance on that Target.
-
Clicking on a Deployment Instance reveals the different Component Instances running on that Deployment Instance.
-
Clicking on a Component Instance reveals the different Actions and Parameters associated with it.
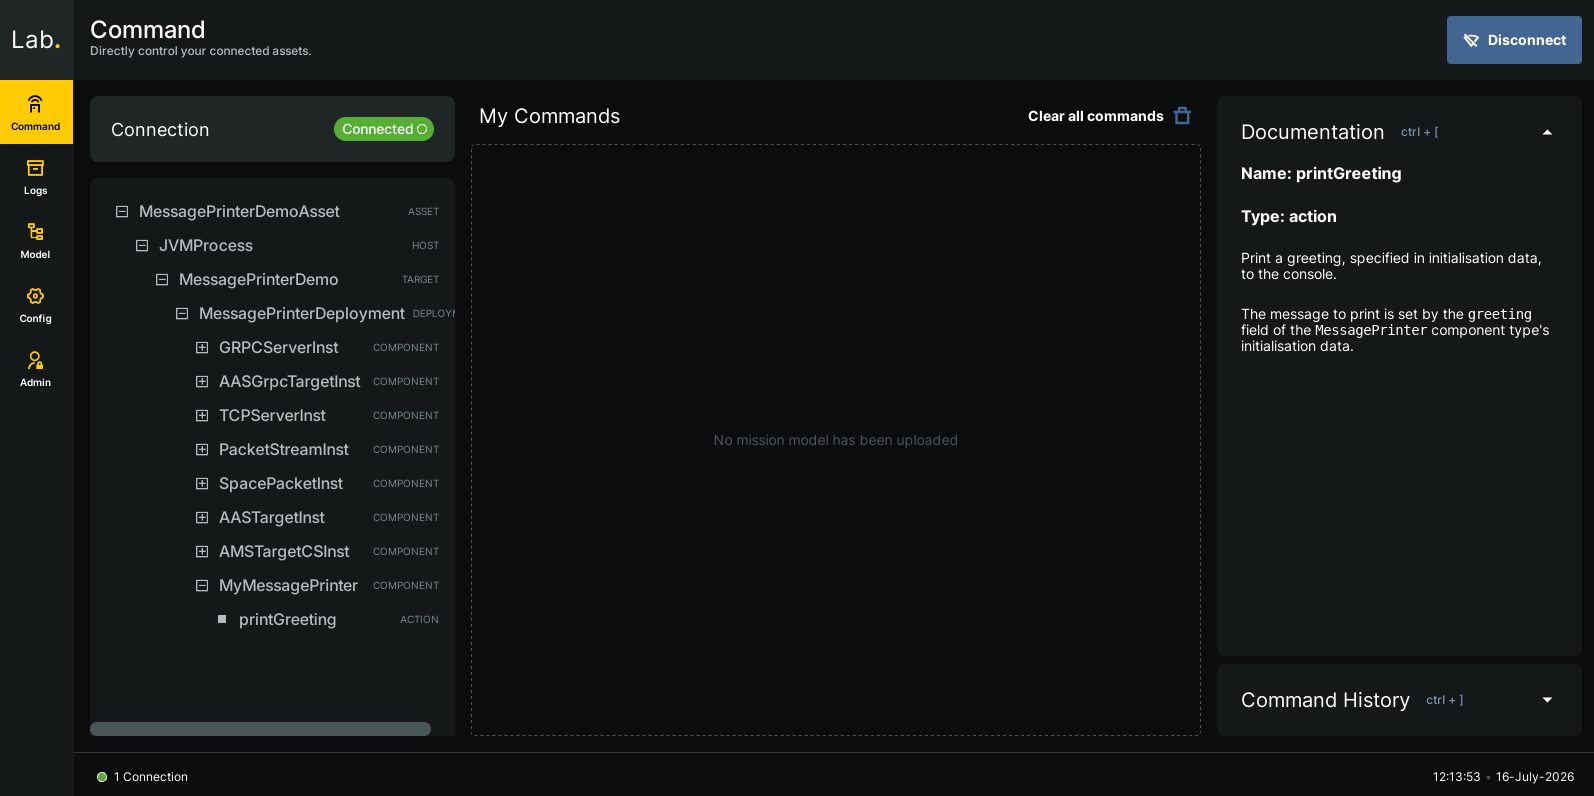
Navigate through the commands explorer to find the printGreeting Action associated with the MyMessagePrinter Component Instance in your Deployment Instance.
Once located, click on the printGreeting Action.
Clicking on the Action adds a command card representing that Action to the 'My Commands' section of the view. Command cards added to this section can be rearranged and used when required.
Clicking on a command card expands the layout to reveal additional fields which are associated with that command.
Expand the printGreeting command card by clicking on it.
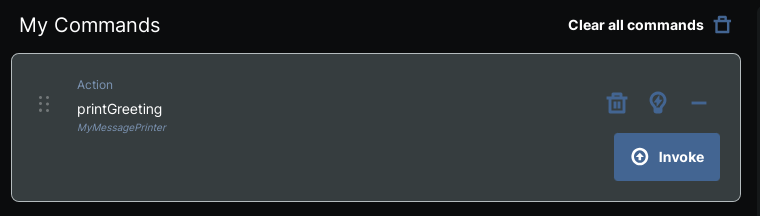
Invoke the printGreeting Action by clicking the Invoke button.
To confirm that the Action was invoked successfully, you can check the returned status displayed in the 'Command History' section, on the right-hand side of the view.
Expand the 'Command History' section by clicking on it.
You should be able to see the Action you just invoked with a green success indicator next to it.
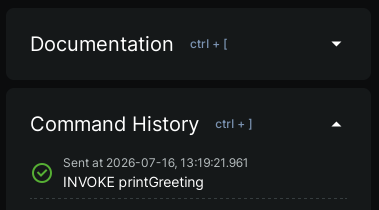
The MessagePrinterDeployment Deployment Instance should also have printed your message to the terminal in which it is running.
Confirm that the Action performed as expected by checking that the correct message has been printed to the terminal in which the MessagePrinterDeployment Deployment Instance is running.
14:38:36.153 [TCPServerInst-serverStartup-thread-0] INFO c.b.c.m.m.MessagePrinterImpl - Greeting says 'Hello there!'|
Additionally, you can see the raw details of the incoming and outgoing packets from your ground software by looking at the 'Packet Log' view. Open the 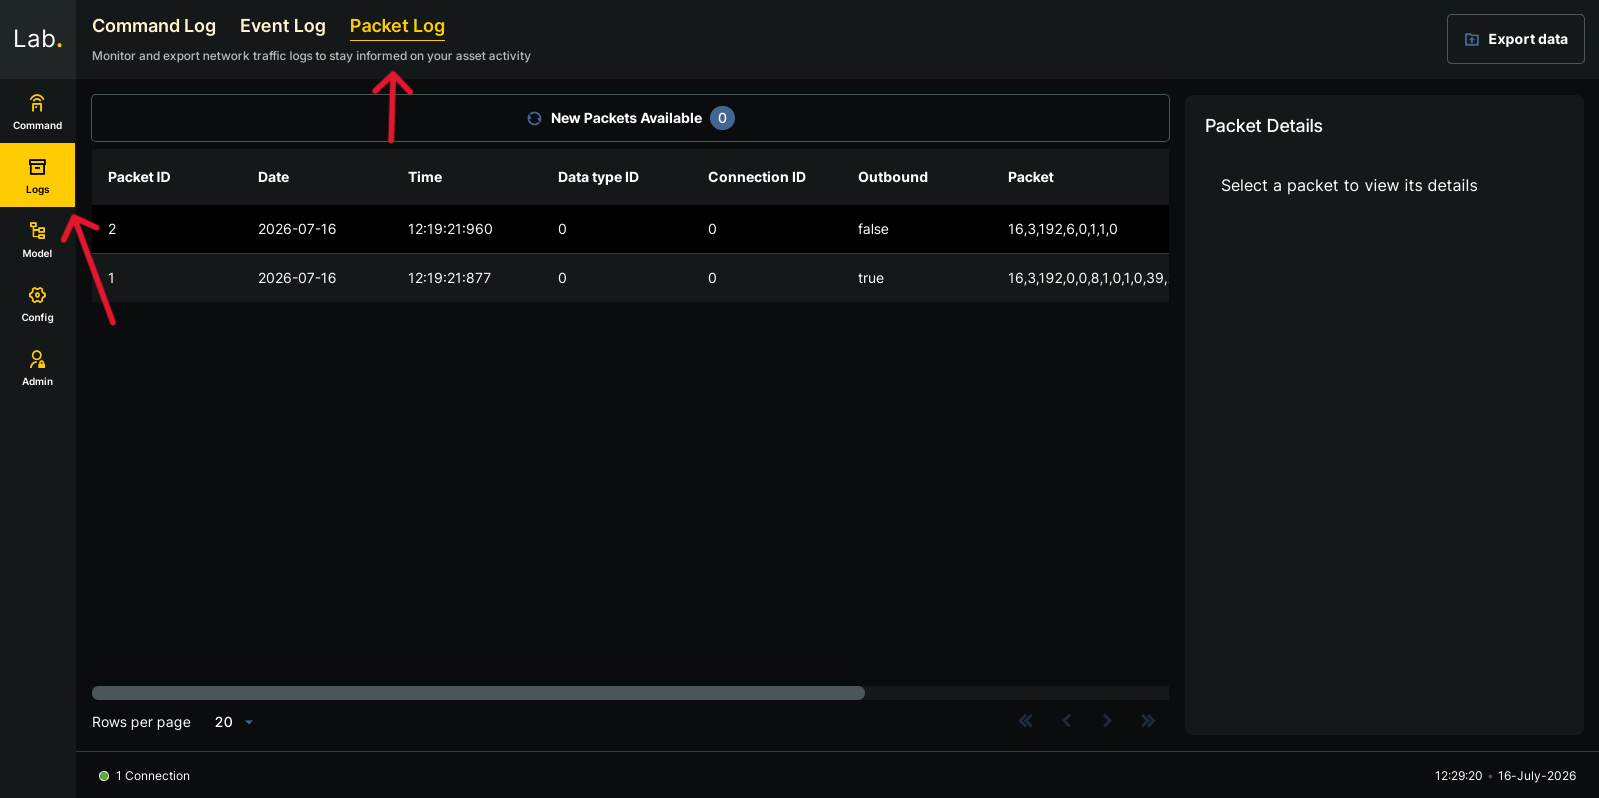
Notice how the MDB has enabled Lab to generate and interpret the transmitted data automatically, without the need for explicit packet configuration. |
Once you are happy the Action is working, disconnect from the
Deployment Instance by clicking the Disconnect button on the
Command view.
If you wish to test with Bruno as well, leave the Deployment Instance running and continue with the steps in the next section. Otherwise, terminate the instance before proceeding.
To terminate the Deployment Instance, press CTRL+C in the terminal in which it is running.
9.2. With Bruno
Switch back to Bruno, select the invoke_action request under the HelloWorld1 collection and click the → right arrow button to send the request.
{
  "provider_id": {
    "target_id": 0,
    "deployment_id": 0,
    "local_provider_id": 0
  },
  "channel_id": 0,
  "selection_id": 0
}
This is a lot of IDs! You don’t need to worry about this right now, just understand that these ids address the printGreeting Action of your MessagePrinter Component in the MessagePrinterDeployment Deployment, which itself is contained within the MessagePrinterDemo Target.
That said, here’s a brief overview of what they mean:
-
the
target_idis the index of the Target we’re addressing, ordered as in themission.xml. In our case, we only have a single Target, so the id is 0. -
the
deployment_idis assigned by the tooling. You can find it inDeployment.java, or in the mission documentation. In our case, it’s fine to bypass the checking, so we use a wildcard value of 0. -
the
local_provider_idchooses amongst the Components Providing a Service, ordered as in thedeploymentType.xmlfile. In our case we are sending a request to the Action Access Service "AAS". This Service is implicitly Provided by Components that Provide Actions, it doesn’t have to be specified in the Component xml. Since ourMessagePrinterComponent is the only one Providing an Action, we use an id of 0. -
channel_id: When you Provide a Service you can optionally choose to Provide on more than one channel, this is usually to Provide some logical subdivision of your Service provision. In this case there is only one channel, so we use an id of 0. -
The
selection_idselects the Service Object from the Service Provider that an Operation will be carried out on. For Actions, your first Action on a Component Type will beselection_id0, your second will be selection id 1 and so on. Since theMessagePrinterComponent has only one Action we use id of 0.
The Action doesn’t return anything, so the response JSON will be an uninteresting empty string for args_out.
{
  "args_out": ""
}
In the terminal running your ground software however, you’ll see the expected log output.
15:22:40.898 [grpc-default-executor-1] INFO c.b.c.m.m.MessagePrinterImpl - Greeting says 'Hello there!'You can verify that there is only a single Action Provided by your Component by running the get_action_count request. This is an empty request that returns a single action_count field.
Switch back to Bruno, select the get_action_count request under the HelloWorld1 collection and click the → right arrow button to send the request.
{
  "action_count": 1
}
Once you are happy the Action is working, terminate the Deployment Instance by pressing CTRL+C in the terminal in which it is running.
10. Wrap Up
In this tutorial we have:
-
Introduced Component Types as encapsulated software functionality which can be reused.
-
Seen how a Component Type can be understood in terms of its
componentType.xmlfile and its implementation. -
Introduced Deployment Types as sets of connected Component Instances.
-
Introduced Missions as sets of Deployment Instances along with their Initialisation Data.
-
Set up an example
MessagePrinterComponent Instance calledMyMessagePrinterin ourHelloWorld1Mission. -
Seen how to configure Lab and Bruno to communicate with a Deployment Instance.
-
Used Lab and Bruno to invoke an action, and seen its effect on the running ground software.
In the next tutorial, you’ll learn how to make changes to Component Types so that you can introduce your own functionality into your ground software.
Click here to move on to that now.