Groundkit Workflow Feature Guide
1. Overview
Working on a piece of software always involves following some development workflow. When working on small tasks this is often informal and implicit, while on larger projects it is often more strictly defined.
Groundkit introduces a formalised development workflow which helps you produce re-usable code and reduce boilerplate. It also helps you compose your code together with code that others have written: including the library of ready-made artefacts that Groundkit ships with.
In this feature guide we describe that workflow: the jobs you’ll carry out and the hgk commands you’ll run. It is not intended to be a reference manual, but a guide to help you use Groundkit as effectively as possible.
|
This guide gives you the shape of the workflow. The Groundkit tutorials teach it hands-on, starting with Hello World 1. |
2. The Development Flow
The diagram below summarises the Groundkit development flow. It is worth returning to as you read the rest of this guide; each stage described later maps onto part of this picture.
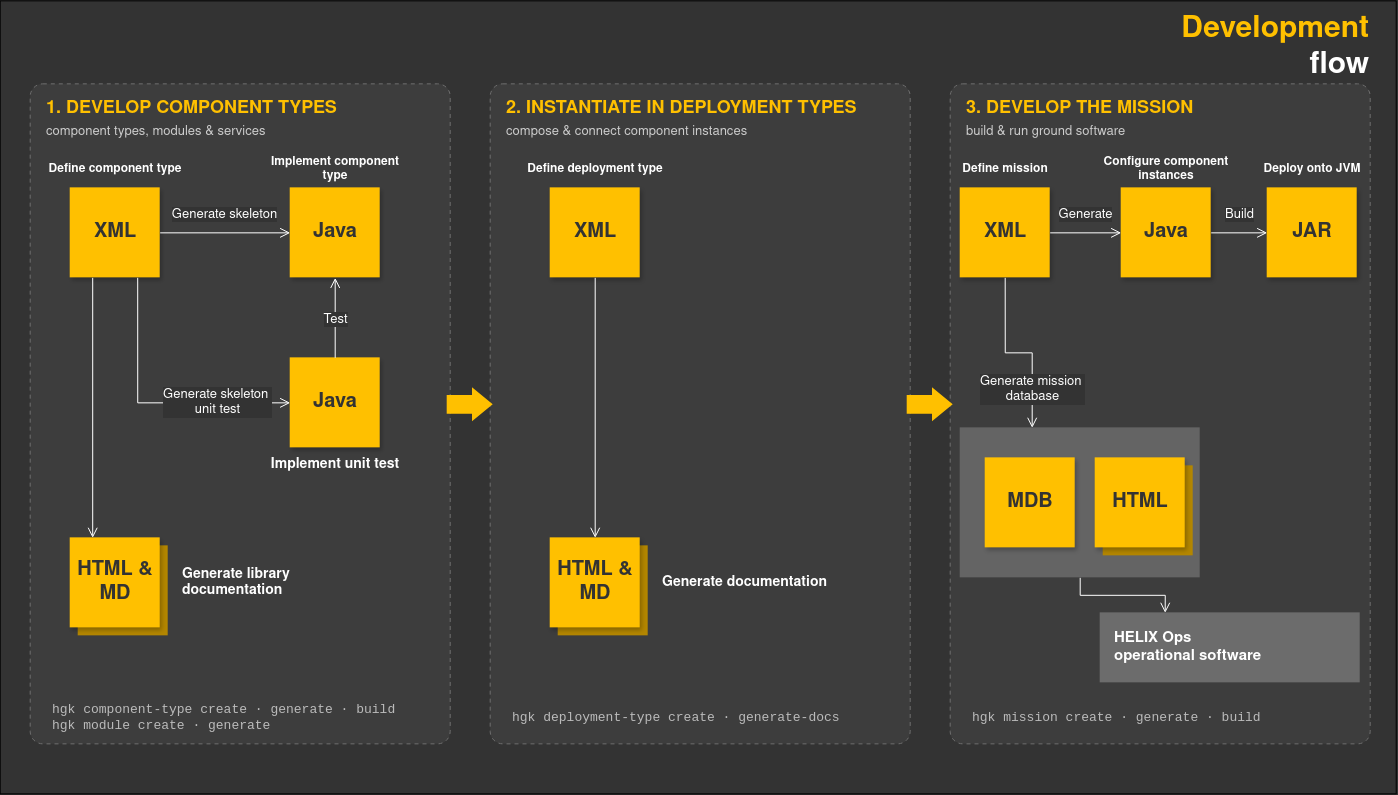
The flow has three stages, shown left to right in the diagram:
-
Developing Component Types (left of the diagram), together with the Services and Modules they rely on. You define a Component Type in XML, generate its skeleton Java code and skeleton Unit Tests, and implement both by hand. You can also generate human-readable library documentation from the XML.
-
Instantiating Component Types in Deployment Types (middle of the diagram). You define a Deployment Type in XML, declaring the Component Instances it contains and how they are connected via Services. Each Deployment Type is a blueprint for an executable application.
-
Developing a Mission (right of the diagram). You bring Deployment instances together in a Mission, configure the Component Instances within them (their Initialisation Data), generate the Java code, and build an executable Java archive for each Deployment instance, ready to run on a Java Virtual Machine. Building the Mission also produces the Mission Database (MDB): a machine-readable model of your ground software, used by HELIX Ops to enable interaction with the Mission.
Although the diagram reads left to right, that is rarely where you start. Because a lot is already provided, the most efficient way to build a Mission is to start from what already exists and adapt it: capture what your ground software must do, study the pre-made Mission in the GroundkitFoundation Bundle and the tutorial Workspaces, and compare them against your needs to see which are already met and which are missing. Integrate available library artefacts to cover as many of the remaining needs as possible, and build only the artefacts that are still missing yourself. These jobs are carried out roughly in sequence, but changes during development will inevitably lead to iteration between the three stages. The rest of this guide describes each stage in turn.
|
Bundles are how ready-made artefacts reach you, and how teams share their libraries. A Bundle is a versioned, read-only snapshot of a Workspace: Bright Ascension ships its libraries as the |
3. Developing Component Types, Modules and Services
You work in this stage when you are building reusable library artefacts: most often Component Types, together with the Services and Modules they depend on. You create a Workspace to hold your work, then create, implement and test the artefacts you need.
|
The tutorials teach this stage hands-on: Hello World 1 walks through your first Component Type end to end, Hello World 2 adds Actions with Arguments and Parameters, Hello World 3 covers Publishing Events, Using a Service covers Services, and Unit Testing covers testing with JUnit and Mockito. |
3.1. Creating a Workspace
All Groundkit development, whichever stage of the flow you are working in, happens inside a Workspace. Create one in your current directory, then, from within the new Workspace directory, prepare it so it is ready for development:
hgk workspace create MyLibrary
cd MyLibrary
hgk workspace prepare
3.2. Creating Services and Modules
Where your Component Types need to interact with each other, they do so through Services: descriptions of functional contracts, similar to API definitions. Many core Services are provided by the GroundkitFoundation Bundle (communications, file transfer, storage, and access to Parameters and Actions, among others).
Shared definitions and utility code that more than one Component Type needs belong in a Module, created and generated the same way with hgk module create and hgk module generate.
Because artefacts reference each other in XML, create an artefact before generating anything that references it. In practice this means working roughly in the order Services, Modules, Component Types, Deployment Types, Missions.
3.3. Creating Component Types
Creating a Component Type involves creating a componentType.xml, describing the type in that XML, generating the implementation files, writing the implementation, and writing tests. These activities may be interleaved.
Choose a name that succinctly expresses what the Component Type does. Names may include a dot-separated package path prefix (such as storage.SimpleConfigStore) to organise many types relative to each other; the generated directories and Java packages reflect the fully qualified name.
Create the componentType.xml with a command similar to:
hgk component-type create TelemetryArchiverThis creates the XML file in your Workspace's library directory, and you edit it to describe the functionality you require:
-
Document how you expect the Component Type to be used.
-
Declare the Services it provides or requires, and any Messages it publishes or subscribes to.
-
Make it observable by adding sensible Parameters, and controllable by adding Actions.
-
Define any Periodic Tasks or Sporadic Tasks it needs to carry out work autonomously.
Once you have a first iteration of the XML, generate the implementation files:
hgk component-type generate TelemetryArchiverThis generates the Java sources and Maven build files for the type. In particular:
-
TelemetryArchiverImpl: the implementation class with methods stubbed for the Service Operations, Messages, Actions and Parameters you declared -
TelemetryArchiverImplInitData: the initialisation-data class to which you can add fields for any configuration values to be set per Deployment instance -
TelemetryArchiverImplTest: A Unit Test skeleton
You implement the behaviour by hand in the Impl class, regenerating whenever you change the XML.
3.4. Testing Your Component Types
Testing is not optional: your ground software is how you will operate your spacecraft, and you and others need confidence that it behaves as intended.
Write JUnit tests in the generated ImplTest class, using Mockito to mock the Services and other collaborators your Component depends on, so its implementation can be tested in isolation. Then build the Component Type and run its tests:
hgk component-type build TelemetryArchiverYou can also build every artefact and run every Unit Test in the Workspace in one go with hgk workspace build. The Unit Testing tutorial walks through writing these tests.
4. Instantiating Component Types in Deployment Types
Deployment Types are blueprints for software: a collection of connected Component Instances. If the pre-made Deployment Types don’t fit your needs, create your own:
hgk deployment-type create ArchiveServerEdit the created deploymentType.xml to declare the Component Instances the Deployment Type contains and how they are connected via Services. A Deployment Type can instantiate any Component Type available to its Workspace: the artefacts you created in the same Workspace's library directory are instantiated exactly like those from a required Bundle.
A Deployment Type has no generate or test command of its own. The source for each Deployment instance, including its Initialisation Data files, is produced when the Mission containing it is generated; the executable Java archive is produced when that Mission is built. You can generate a Deployment Type's documentation to review what you have defined:
hgk deployment-type generate-docs ArchiveServer5. Developing a Mission
The final stage is creating the ground software for your mission itself: designing it, assembling it from what already exists, building it, and maintaining it as your requirements change.
5.1. Designing Your Mission
Before writing anything, record what your ground software is responsible for at a high level. Capturing responsibilities first, before deciding how they are organised, tends to reveal similar responsibilities appearing in several places; these often translate into reuse of the same functional blocks.
A few design guidelines are worth bearing in mind:
-
Keep the coupling between functional blocks loose: do not let the design of one block become intimately tied to another. In Groundkit these loose couplings translate into the use of Services.
-
Prefer a design that falls short of your end requirements but is flexible to expansion over a large one that is too fragile to accommodate change.
It is also worth keeping in mind the four major artefacts Groundkit will ask you to use to describe your software:
-
Component Types: reusable functional blocks, each typically fulfilling a single responsibility. They are instantiated in Deployment Types.
-
Services: descriptions of functional contracts, used to make loose couplings between Component Types.
-
Deployment Types: a group of instantiated Components and the connections between those Component Instances.
-
Missions: collections of Deployment instances, together with the Assets they are assigned to: the physical locations where they will run.
Your complete design will typically produce a single Mission and one or more Deployment Types, and will reuse many Component Types and Services provided by Bright Ascension while you create only a small number yourself.
5.2. Starting From What We Provide
The GroundkitFoundation and GroundkitExtras Bundles are delivered with Groundkit. First, see what Bundles you have installed:
hgk bundle list|
To install a new Bundle, use the following command. Once installed, the Bundle appears in |
Then generate a Bundle's documentation so you can browse its contents (use the version reported by hgk bundle list):
hgk bundle generate-docs GroundkitFoundation:<version> <output_directory>GroundkitFoundation contains the core building blocks of a typical Mission (Components and Services for communications, file transfer, storage and more) along with a pre-made Deployment and Mission for communicating with a basic Flightkit Mission. Use the pre-made Mission as a worked example of how we compose ground software: it shows how Component Instances are connected together with Services and given their Initialisation Data.
The tutorial Workspaces (installed by hgk-prepare-tutorials) are also complete, buildable starting points, each small enough to read in full.
With these examples open alongside your own requirements, mark which needs are already met and which are missing: this comparison tells you exactly how much you need to add.
To start building, create a Workspace for your Mission and, from within it, add a requirement on each Bundle you are building on:
hgk workspace create MyMission
cd MyMission
hgk workspace bundle require GroundkitFoundation
hgk workspace prepare
Unless you specify a version (hgk workspace bundle require <BundleName>:<version>), hgk brings in the latest installed version of the Bundle. Note that the Workspace must be prepared again after a Bundle requirement is added.
For the needs that no existing artefact covers, you will create your own library artefacts: most often Component Types, and occasionally Services, Modules or Deployment Types. Because these may be reused in future Missions in ways you didn’t originally intend, avoid creating artefacts that are "over-fitted" to your current requirements.
Creating these artefacts means stepping back into the first two stages: you create, implement and test what you need, instantiate it in your Deployment Types, then return to your Mission. You can do this directly in your Mission's Workspace; if the artefacts are likely to be useful to other Missions, consider developing them in a library Workspace of their own and sharing them as a Bundle (see the Workspaces & Bundles feature guide).
|
Ground software often spans more than one Deployment instance, or needs to be reached by external tools. Groundkit generates gRPC interfaces for your Services and Messages: the generated |
5.3. Assembling and Building the Mission
With the Component Types and Deployment Types you need in place, bring them together in a Mission. A Mission assigns Deployment instances to the Assets where they will run.
Create a Mission using your mission or project name:
hgk mission create Voyager3Edit the created mission.xml to assign your Deployment instances to named Assets, then generate the Java code for every Deployment instance in the Mission:
hgk mission generate Voyager3Populate the Initialisation Data for the Component Instances in each Deployment instance, including any fields you added to the ImplInitData classes, then build the Mission:
hgk mission build Voyager3This produces an executable Java archive for each Deployment instance in the Workspace's output directory, ready to run on any machine with a Java 17 runtime. It also generates the Mission Database (MDB): the machine-readable model of your ground software that HELIX Ops uses to interact with the Mission. In all likelihood you will reach this stage having built only some of the artefacts you need, and will iterate back to earlier stages to add more.
5.4. Maintaining Your Mission and Library
As your requirements change, you will maintain the artefacts you’ve created: modifying their XML definitions, regenerating, propagating changes into implementations and Unit Tests, and keeping the Initialisation Data of your Deployment instances up to date. If your Component Types are shipped in a Bundle, choose each new version number to reflect the impact of the change (see the Workspaces & Bundles feature guide for Bundle versioning), and try to keep breaking changes rare.
Because you will compose your Mission largely from Bundles, pay close attention to the version of each Bundle you use. When changing the version of a Bundle, consult its change notes to determine what updates your Mission will need. For the Bundle shipped with Groundkit, these are the GroundkitFoundation Release Notes. When updating Groundkit itself, consult the Groundkit Release Notes.
6. Related Documentation
-
Feature Guide: Workspaces & Bundles
-
Tutorial: Hello World 1