Flightkit Workflow Feature Guide
1. Introduction
Flightkit introduces a formalised development workflow which helps you produce re-usable code and reduce boilerplate. It also helps you compose your code together with code that others have written: including the large library of ready-made artefacts that Flightkit ships with.
In this feature guide we describe that workflow: the jobs you’ll carry out, the hfk commands you’ll run, and, importantly, how to start from the pre-made Missions and Component Types we provide rather than from a blank page. It is not intended to be a reference manual, but a guide to help you use Flightkit as effectively as possible.
|
This guide gives you the shape of the workflow. The Flightkit tutorials teach it hands-on and contain everything you need to learn the architecture and the day-to-day mechanics: start with Hello World 1. Throughout this guide we point to the tutorial or reference document that covers each step in depth. |
2. The Development Flow
The diagram below summarises the Flightkit development flow. It is worth returning to as you read the rest of this guide: each stage described later maps onto part of this picture.
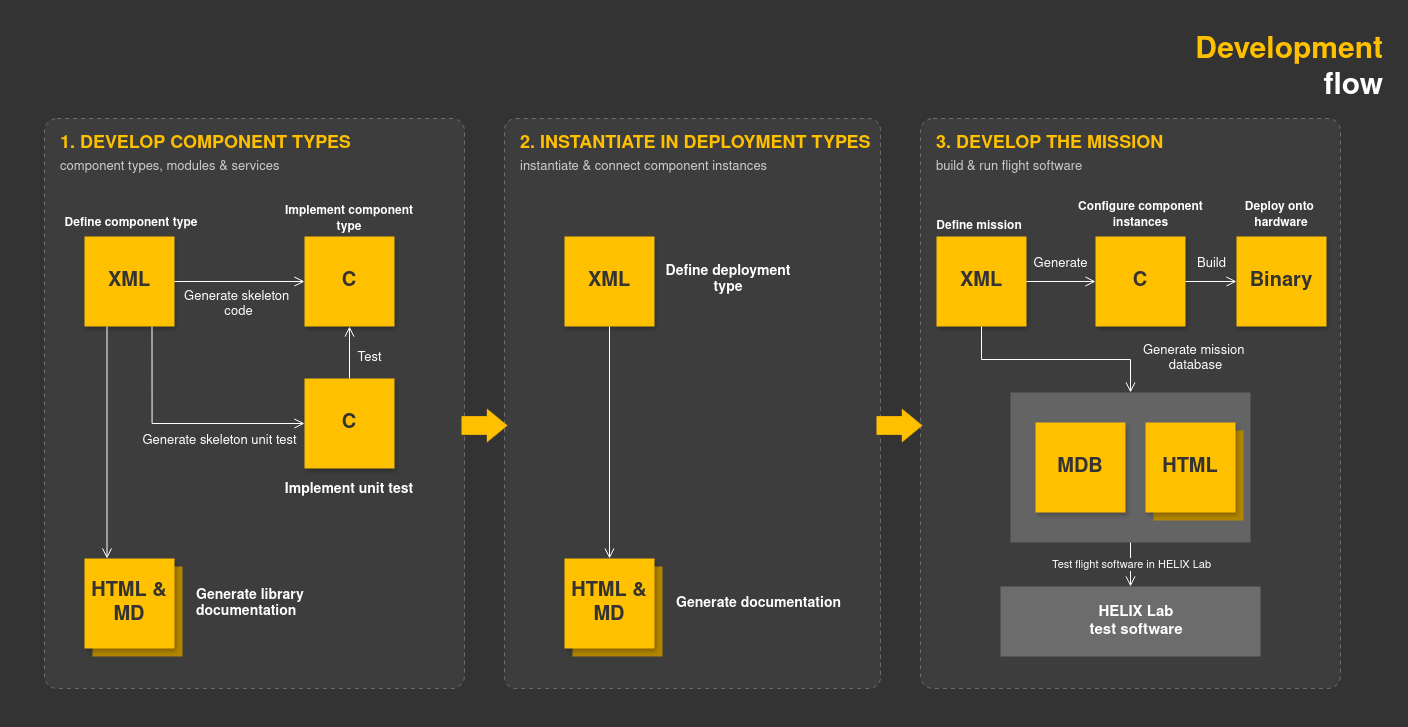
The flow has three stages, shown as the three columns of the diagram. From left to right:
-
Developing Component Types (left), along with the Modules and Services they rely on. You define a Component Type in XML, generate its skeleton code, and implement its behaviour in C. In parallel you generate skeleton Unit Tests and implement them. You can also generate human-readable library documentation from the XML.
-
Instantiating Component Types in Deployment Types (middle). You define each Deployment Type in XML, instantiating Component Types and connecting the Component Instances together through Services to describe a complete Deployment.
-
Developing the Mission (right). You instantiate Deployment Types in a Mission, configure the Component Instances within them (their Initialisation Data), generate the code, build a binary for the target hardware, and deploy it onto a target. Building the Mission also produces a Mission Database: a machine-readable representation of the model defined by your Mission, which ground software such as HELIX Lab uses to command and monitor your flight software.
Although the diagram reads from left to right, the best way to approach a new Mission is not to start at the left with a blank page. First, define what your flight software must do: your concept of operations (ConOps). Then start from the most relevant pre-made Mission and compare it against your needs: reuse ready-made library artefacts to cover as many of them as possible, and build your own only for the needs that remain unmet.
|
Expect changes during development to lead to iteration between the three stages. |
The rest of this guide describes the three stages in turn.
|
Ready-made artefacts reach you as Bundles: versioned, read-only collections of Flightkit artefacts. Bright Ascension ships its library as Bundles, teams share their own libraries the same way, and your Workspaces require the Bundles they build on. See the Workspaces & Bundles feature guide for how Bundles and Workspaces work. |
3. Developing Component Types, Modules and Services
You work at this stage when you are building reusable functional blocks: most often Component Types, which access other functionality through the Services and Modules they declare in their XML. Many teams do this only occasionally, whenever the ready-made library doesn’t already meet a need.
|
The tutorials teach this stage of the workflow hands-on: Hello World 1 walks through your first Component Type implementation, Hello World 2 and Hello World 3 add Events and Tasks, Using a Service covers Services, Unit Testing covers testing with Unity and CMock, and Hardware Interaction 1: MAS and Hardware Interaction 2: PS cover hardware-facing Component Types. |
3.1. Creating a Workspace
All Flightkit development, whichever stage of the flow you are working in, happens inside a Workspace. Create one for your library, then, from within the new Workspace directory, prepare it so it is ready for development:
hfk workspace create MyLibrary
cd MyLibrary
hfk workspace prepare
3.2. Reusing Subsystem Components
Before building a Component Type of your own, check whether one already exists. Many spacecraft needs come down to talking to a hardware subsystem: an ADCS, a magnetometer, a gyroscope, an analogue-to-digital converter, and so on. Flightkit provides ready-made Component Types for a range of these under the subsystem directory of the component-type library, organised by vendor (for example subsystem.cubespace.CubeADCS, subsystem.honeywell.HMC5883, subsystem.qinetiq.Q20, subsystem.siliconsensing.CRM200 and subsystem.ti.TLV2548). Browse this directory in the generated Bundle documentation to see which of your hardware needs are already covered.
Subsystem Components are provided in both the FlightkitFoundation and FlightkitExtras Bundles.
|
All artefacts in |
Once you have identified the subsystem Components you can reuse, instantiate them following the pattern set by the pre-made Mission models for how such Component Instances are connected and configured. Whatever needs remain uncovered after reusing the library are the ones to implement yourself.
|
The Supporting Subsystems how-to guide gives best-practice advice for working with hardware subsystem Components. |
3.3. Creating Component Types
Creating a Component Type involves creating a componentType.xml, describing the type in that XML, generating the implementation files, writing the implementation, and writing tests. These activities may be interleaved.
Choose a name that succinctly expresses what the Component Type does. Bright Ascension follows a few conventions:
-
Most Component Types are named with nouns describing a role, such as
DataMonitor,PayloadManagerorRadioController. -
Those that interact with hardware or other systems are often named for the physical system they provide access to, such as
FileSystem,EPSorCommsGateway. -
Names may include a package path prefix (such as
subsystem.<vendor>.<name>) to organise many types relative to each other.
Create the componentType.xml with a command similar to:
hfk component-type create PayloadManagerThis creates library/component_types/PayloadManager/componentType.xml, which you edit to describe the functionality you require:
-
Document it using the
<Description>and<Documentation>elements: describe how you expect the Component Type to be used. -
Access other functionality via the
<Services>,<Required><Module>and<Required><ComponentType>elements. -
Make it observable by adding sensible
<Parameters>, and controllable by adding<Actions>.
Once you have a first iteration of the XML, generate the implementation files:
hfk component-type generate PayloadManagerThis produces the C and H files and build-system files under library/component_types/<ComponentFQN>. In particular, the implementation lives in <ComponentFQN>.c, the main structure and Initialisation Data in include/<ComponentFQN>.h, and the tests in test/<ComponentFQN>_Test.c.
|
For a detailed account of the files associated with Component Types, see the Component Layout Reference. |
3.4. Testing Your Component Types
Testing is strongly recommended: when reusable software is used in space systems, where the consequences of failure can be severe, you and others need confidence that it behaves as intended. Not every Component Type lends itself to Unit Testing, though: those that interact directly with hardware are often better validated on the target hardware itself.
Add Unit Tests to your Component Type's test file and run them with:
hfk component-type test PayloadManagerThe Unit Testing tutorial shows how to write these tests using the Unity and CMock support built into the Flightkit Tooling, including how to mock the Services a Component depends on. Beyond Unit Testing of individual Component Types, carry out integration testing of your assembled Deployment instances as needed: building and running a Mission on the target hardware is itself an important part of validating that your Components work together.
4. Instantiating Component Types in Deployment Types
Deployment Types are blueprints for complete Deployments: a collection of connected Component Instances. If the pre-made Deployment Types don’t fit your needs, create your own:
hfk deployment-type create DataHandlerThis creates library/deployment_types/DataHandler/deploymentType.xml, which you edit to describe the Component Instances you require:
-
Document it with the
<Description>and<Documentation>elements. -
Specify an
<Architecture>element (with optional<Board>and<OSAL>elements) to control which board and OSAL the Deployment Type targets, and to allow board-specific Component Types to be instantiated. -
Add
<Component>elements inside<Implementation>for each Component Instance, along with their<Connections><Services>and<Tasks>.
The Component Types you instantiate can come from a required Bundle or from your own Workspace: Component Types you created in the same Workspace's library tree are instantiated exactly like those from a Bundle. Where the same Component Type name is available from more than one place, such as from two Bundles or from both a Bundle and your own Workspace, hfk cannot choose between them. Add a version attribute to that Component Type's <Component> element, giving the version of the Bundle it comes from, to say which one you mean.
You write no implementation code for a Deployment Type, so this XML is all that is required: the C code for a Deployment instance is generated for you when you generate or build the Mission that uses it. There is also no test command for Deployment Types; the only generation step that applies to a Deployment Type on its own is documentation generation, which you can use to check the XML is complete:
hfk deployment-type generate-docs DataHandler5. Developing a Mission
You work at this stage when you are creating the flight software for a spacecraft. Because so much is already provided, the most efficient way to build a Mission is to start from something that already works and adapt it. The sections below discuss the jobs involved in turn.
5.1. Designing Your Mission
Before writing anything, record what your flight software is responsible for at a high level: your ConOps. Capturing responsibilities first, before deciding how they are organised, tends to reveal similar responsibilities appearing in several places; these often translate into reuse of the same functional blocks.
A few design guidelines are worth bearing in mind:
-
Keep the coupling between functional blocks loose: do not let the design of one block become intimately tied to another. In Flightkit these loose couplings translate into the use of Services.
-
Prefer a design that falls short of your end requirements but is flexible to expansion over a large one that is too fragile to accommodate change.
It is also worth keeping in mind the four major artefacts Flightkit will ask you to use to describe your software:
-
Component Types: reusable functional blocks, each typically fulfilling a single responsibility. They are instantiated in Deployment Types.
-
Services: descriptions of functional contracts (similar to API definitions), used to make loose couplings between Component Types.
-
Deployment Types: a group of instantiated Components and the connections between those Component Instances.
-
Missions: collections of Deployment instances, together with information about the physical Assets they run on and where.
Your complete design will typically produce a single Mission, one or more Deployment Types, and, crucially, will reuse many Component Types and Services provided by Bright Ascension while you create only a small number yourself.
5.2. Starting From a Pre-made Mission
The FlightkitFoundation Bundle includes demonstration Missions built for the boards Flightkit supports: for example LinuxDemo, PiDemo, KrytenDemo and EnduroSatObcDemo. Choose the one whose target hardware matches yours and use it as the starting template for your own Mission.
First, see what Bundles you have installed:
hfk bundle listIf a Bundle you need is not listed, install it from its archive first (the Workspaces & Bundles feature guide covers how Bundles are distributed and installed):
hfk bundle install <path-to-bundle-archive>Then generate a Bundle's documentation so you can browse its contents (use the version reported by hfk bundle list):
hfk bundle generate-docs FlightkitFoundation:<version> .A pre-made Mission is a worked example of how we compose flight software. Use it to learn from the ready-made code:
-
Its Deployment Types (for example
acs/kryten,endurosat/BasicCommsDemo,endurosat/PUSCommsDemo, orgeneric/linux) show how Component Instances are connected together with Services. -
Its Component Types and Component Instances show how each block is configured and given its Initialisation Data.
With the pre-made Mission open alongside your ConOps, work through your requirements and mark which are already met by the template and which are missing. This comparison is the core of the mission-first approach: it tells you exactly how much you need to add.
|
If a requirement is a close but imperfect match to something already provided, consider whether the requirement can be tweaked to reuse the existing artefact. It is often worth adjusting your design to make better use of what is already available. |
|
For board-specific guidance on building and running these Missions, see the how-to guides for ACS Kryten, EnduroSat OBC and Raspberry Pi Zero. |
Once you have chosen your starting template, create a Workspace for your Mission and, from within it, add a requirement on each Bundle you are building on:
hfk workspace create MyMission
cd MyMission
hfk workspace bundle require FlightkitFoundation
hfk workspace prepare
Unless you specify a version (hfk workspace bundle require <BundleName>:<version>), hfk brings in the latest installed version of the Bundle. Note that the Workspace must be prepared after a Bundle requirement is added.
For the needs that no existing artefact covers, you will create your own library artefacts: most often Deployment Types, and occasionally Component Types. Because these may be reused in future Missions in ways you didn’t originally intend, avoid creating artefacts that are "over-fitted" to your current requirements.
Creating these artefacts means stepping back into the first two stages of the flow: stage 1 to create, implement and test the Component Types you require, and stage 2 to instantiate them in Deployment Types. You can do this directly in your Mission's Workspace, then return to your Mission. If your new artefacts are likely to be useful to other Missions, consider developing them in a library Workspace of their own.
|
Refer to the see the Workspaces & Bundles feature guide to learn more about how libraries are shared as Bundles. |
5.3. Assembling and Building the Mission
With the Component Types and Deployment Types you need in place, bring them together in a Mission. A Mission defines the physical Assets in the space system, the Targets on those Assets (which pair Deployment Types to Assets), and the Deployment instances accessed by those Targets.
Create a Mission using your Mission or project name:
hfk mission create Voyager3This creates missions/Voyager3/mission.xml with <Assets> and <Targets> elements to populate and guidance comments to follow. Unlike library artefacts, Missions are not types and cannot be reused.
Once you have added an Asset, a Target and at least one Deployment instance, generate the Initialisation Data:
hfk mission generate Voyager3This creates an Initialisation Data file for each Component Instance in each Deployment instance. Each file contains a structure, defined by the Component Type, whose values you set to make that Component Instance behave as required: this is where you configure the Component Instances in your Mission.
Finally, build the Mission:
hfk mission build Voyager3This produces a binary in the output tree for each Deployment instance, ready to run on the Assets named in the mission.xml, along with the Mission Database that HELIX Lab and other ground software use to command and monitor the flight software. In all likelihood you will reach this stage having built only some of the artefacts you need, and will iterate back to earlier stages to add more.
|
For a detailed account of the structure of a Mission, see the Mission Layout Reference. |
5.4. Maintaining Your Mission and Library
As your requirements and designs change, you will maintain the artefacts you’ve created.
Maintaining Component Types usually means modifying the componentType.xml, regenerating and propagating changes into the implementation C file, updating Unit Tests, and, if the Component Type is shipped in a Bundle, generating a new Bundle version. Try to keep breaking changes rare: a parameter can be renamed non-breakingly, for instance, by adding the new name, deprecating the old, and removing it only when you next make breaking changes.
Maintaining Deployment Types usually means propagating Component Type changes into the Deployment Types that instantiate them, keeping all Service connections valid, and releasing a new major Bundle version if a change forces users to update their Deployment instances or Initialisation Data.
Maintaining Missions means keeping the physical part (Assets and Targets) in step with their type definitions, and maintaining the functional part: the Initialisation Data for each Component Instance, the library configurations that control how each Component Type is built (lib_config/meson.build), and the build configurations that define compiler and meson settings. You will often start with a build configuration provided by Bright Ascension and customise it as development progresses.
Because you will compose your Mission largely from Bundles, pay close attention to the version of each Bundle you use. When changing the version of a Bundle, consult its change notes to determine what updates your Mission will need. For the Bundles shipped with Flightkit, these are the FlightkitFoundation Release Notes and the FlightkitExtras Release Notes.
6. Related Documentation
-
Feature Guide: HELIX Flightkit Overview
-
Feature Guide: Workspaces & Bundles
-
Tutorial: Hello World 1